Configuring OpenStudio Application Build Environments
Wiki ▸ Configuring OpenStudio Application Build Environments
Building OpenStudio Application
Advanced: Building OpenStudio Application Dependencies
This is the fastest, most reliable method of getting a working OpenStudio build. These instructions assume that you have successfully cloned the OpenStudio Application repository already. For these instructions we will refer to the root of the OpenStudio checkout as ..
We are now using conan to manage build dependencies. To install conan you need to install python (install version 3 or greater) and pip install conan or sudo pip install conan, and make sure that your python bin dir is in your path. After that the rest of it should be automatic.
Information on maintaining conan packages for OpenStudio is in conan-openstudio-ruby. The NREL OpenStudio packages are distributed through (bintray)[https://bintray.com/commercialbuilding/nrel].
We are no longer downloading Qt via CMake, and you will need to install Qt 5.15 LTS manually via the online installer or via an automated tool such as aqtinstall (Note that by using this tool, you agree to the Qt License agreement)
The best source for aqtinstall is the Github Actions workflow we use (cf app_build.yml), but as an example for windows:
cd C:\src\OpenStudioApplication
pip3 install aqtinstall
aqt install --outputdir ./build/Qt-install/ 5.15.0 windows desktop win64_msvc2019_64 -m qtwebengine qtwebglplugin
Install Visual Studio 2019, CMake 3.15 or greater (prefer latest, 3.19.4 as of this writing), and Git for windows. Install conan (see section above), and optionally QtIFW (to build installers, see section below).
Set the PreferredToolArchitecture environment variable to x64 (this is the default anyways in MSVC 2019), this will use 64 bit compiler tools and performs much better (you may still create 32 bit builds with the 64 bit compiler tools).
Clone the OpenStudio repository, launch the CMake GUI, and select the source and build directories. Configure build options and press generate. Certain configuration options may require installation of additional dependencies, these are documented below. After generating, open OpenStudio.sln in the build directory with Visual Studio and choose Build Solution.
Note: Long paths issues have arisen due to some dependencies of openstudio. We recommend cloning the repository to C:\src\OpenStudioApplication for example, and build in C:\src\OpenStudioApplication\build\
Here are terminal instructions for cloning the repository, but you can achieve the same using your favorite Git GUI (Github for Windows, Atlassian Sourcetree, Gitkraken, to name a few)
cd C:\
mkdir src
cd src
git clone https://github.com/openstudiocoalition/OpenStudioApplication.git
cd OpenStudioApplication
mkdir build/
# Then configure using CMake-GUI
Then configure using CMake-GUI
In CMake-GUI:
- "Where is the source code":
C:/src/OpenStudioApplication - "Where to build the binaries the source code":
C:/src/OpenStudioApplication/build
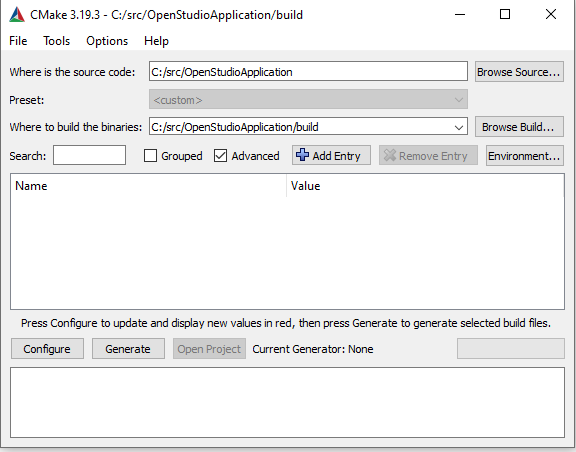
- Hit configure. This takes a while as it will download dependencies (conan + others such as
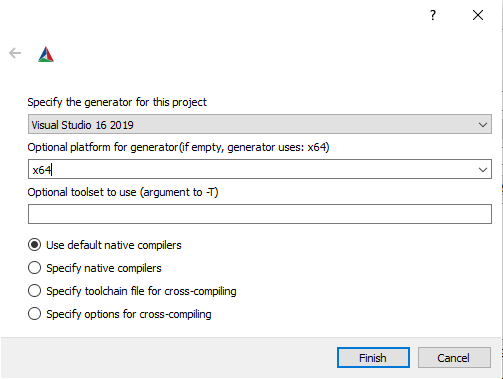
If you haven't set QT_INSTALL_DIR before the first configure, an error will be noted. Locate the QT_INSTALL_DIR variable in the list after ticking the "Advanced" box next to the search bar, and fill it up with the path to where you have installed Qt. For eg, on Windows with aqtinstall instructions given above, it would be C:\src\OpenStudioApplication\build\Qt-install\5.15.0\msvc2019_64. Then hit configure again.
Ubuntu Bionic 18.04 is the primary version of Linux supported. To install build dependencies:
sudo apt install build-essential git cmake-curses-gui cmake-gui libssl-dev libxt-dev \
    libncurses5-dev libgl1-mesa-dev autoconf libexpat1-dev libpng-dev libfreetype6-dev \
    libdbus-glib-1-dev libglib2.0-dev libfontconfig1-dev libxi-dev libxrender-dev \
    libgeographic-dev libicu-dev chrpath bison libffi-dev libgdbm-dev libqdbm-dev \
    libreadline-dev libyaml-dev libharfbuzz-dev libgmp-dev patchelf python-pip
Install CMake.
Note: this is now an up-to-date PPA from kitware! Refer to the instructions on https://apt.kitware.com/
Old way: manual build:
CMAKE_VERSION=3.19.4 # Update with latest by checking https://cmake.org/download/
wget https://github.com/Kitware/CMake/releases/download/v$CMAKE_VERSION/cmake-$CMAKE_VERSION.tar.gz
tar xfz cmake-$CMAKE_VERSION.tar.gz
cd cmake-$CMAKE_VERSION
./configure
make -j$(nproc)
sudo make installInstall Xcode and CMake.
Clone the OpenStudio repository, launch the CMake GUI, and select the source and build directories. Configure build options and press generate. Certain configuration options may require installation of additional dependencies, these are documented below. After generating, change directories into the build directory and run make -j$(nproc).
Clone the OpenStudio repository, create a build directory, and run ccmake:
git clone https://github.com/NREL/OpenStudioApplication.git
cd OpenStudioApplication
mkdir build
cd build
ccmake -DCMAKE_BUILD_TYPE=Release ../
You can also specify build options using CMake args. For example, if you wanted to build a debug version, you can specify this.
ccmake -DCMAKE_BUILD_TYPE=Debug ../
Configure build options and generate. Certain configuration options may require installation of additional dependencies, these are documented below. After generating, change directories into the build directory and run make.
Install QtIFW
Install QtIFW
Install QtIFW
Most developers do not have to worry about building OpenStudio dependencies, the correct dependencies will be downloaded as needed when building the OpenStudio Application project. Only developers needing to update the version of OpenStudio dependencies or provide dependency builds for new platforms need to read this section. After new OpenStudio dependencies are built, they are uploaded to Amazon S3 and the ./CMakeLists.txt file is updated to reference the new packages.
Download pre-built Qt libraries or source code same link. More information on building your own QT libraries. https://doc.qt.io/qt-5/build-sources.html