
- 将XML弹幕转换为ASS弹幕。
- 更高效的弹幕排列方式。详见 issue。
- 移除 FFmpeg无法渲染的 emoji 符号。
- 支持不同字体大小及 superchat 字体大小(根据 superchat 字体大小动态调整 superchat 框大小)。
- 支持不同分辨率的自适应布局。
- 支持不同金额的 superchat 颜色及时间区分。
- 支持不同操作系统,通过Python实现跨平台。
- 没有任何第三方依赖库,无需考虑版本兼容(Python >= 3.6)。
- 支持移动端原生直播间渲染(testing)。
- 未来将添加更多功能,如果您有任何优化或者改进建议,欢迎 提交 issue。
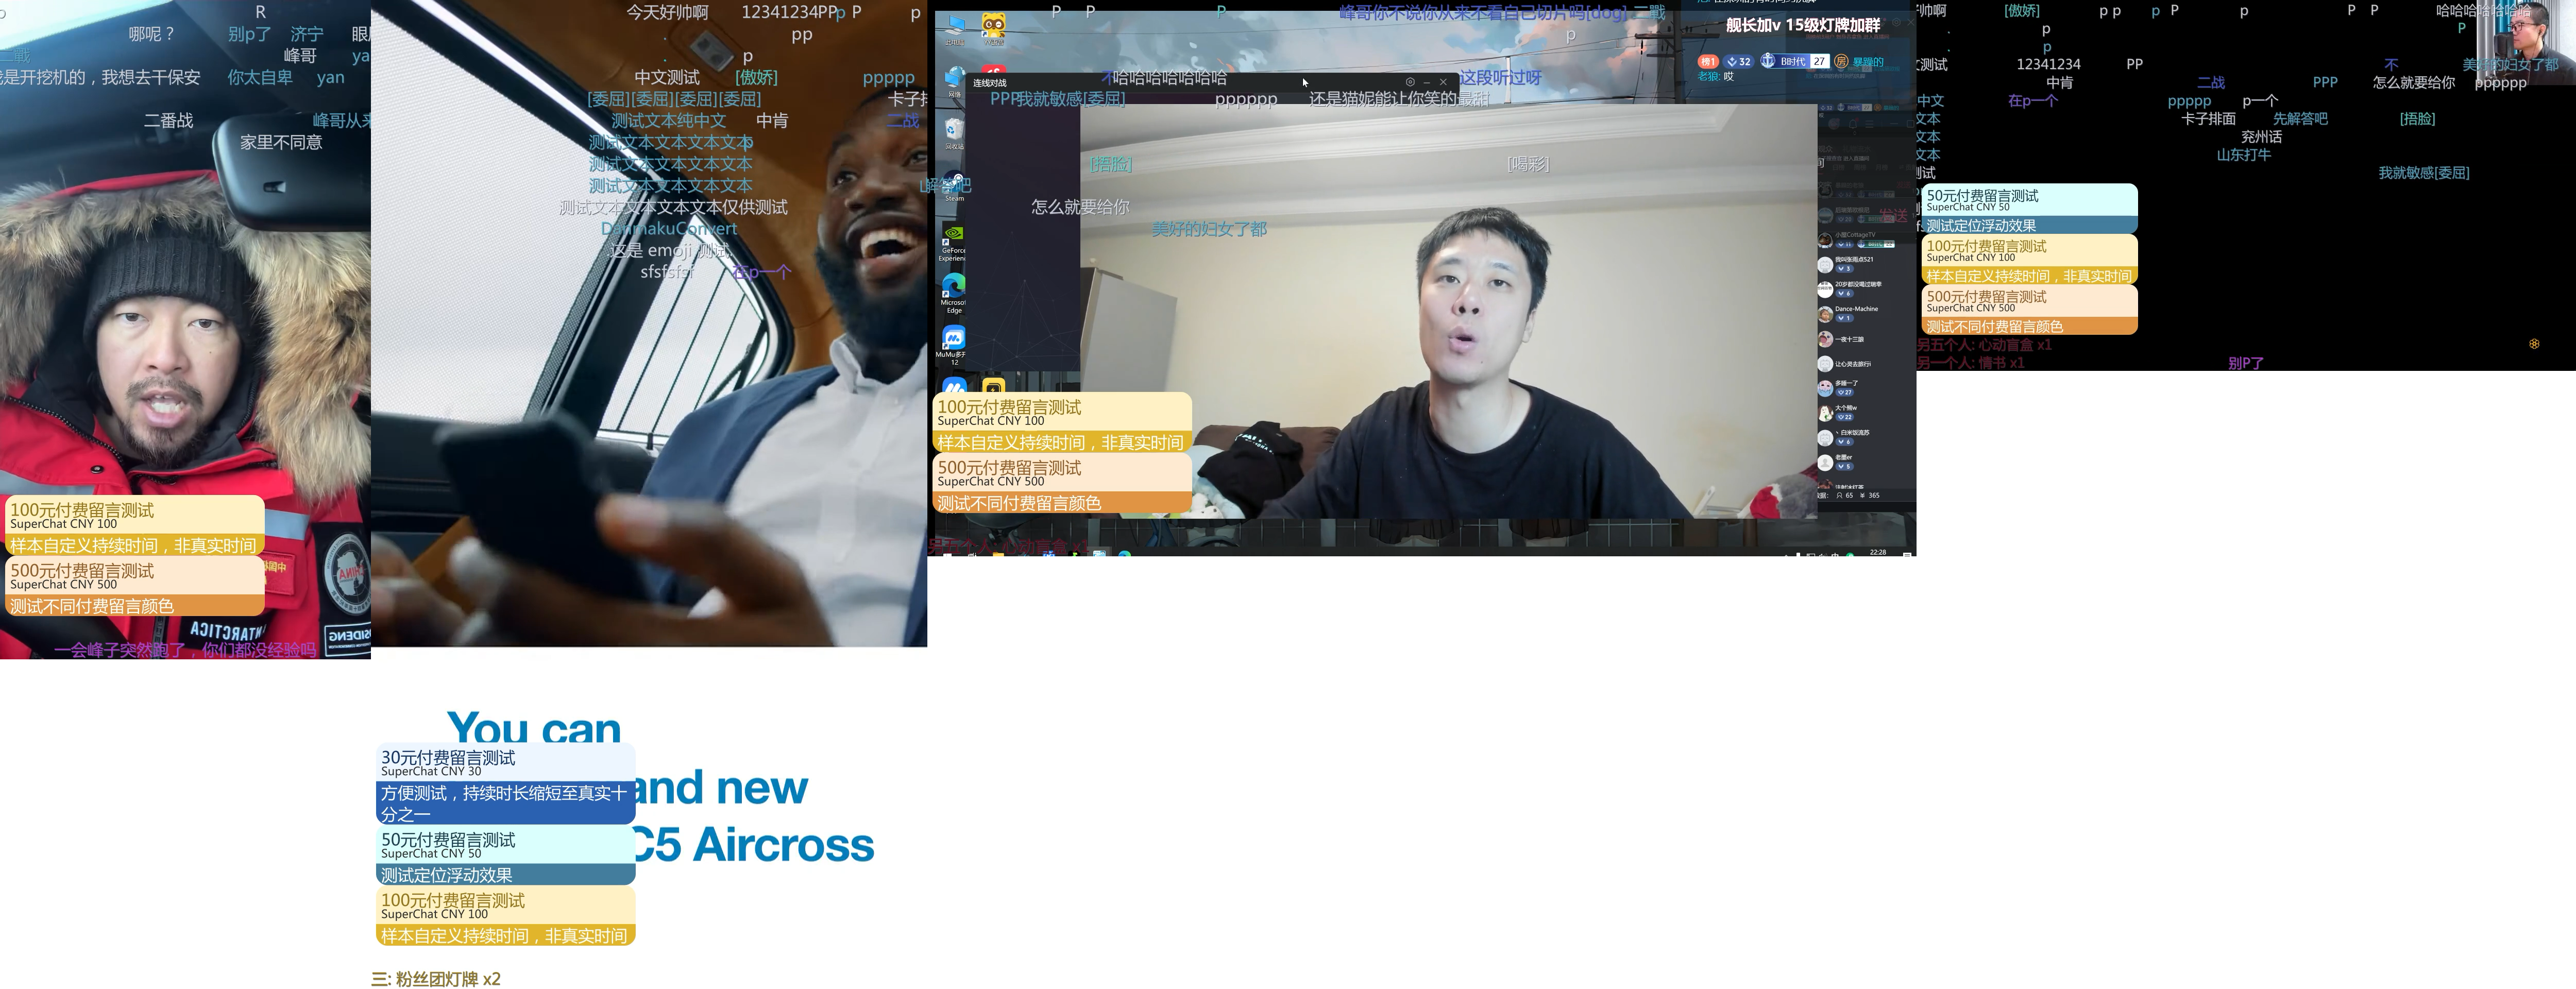
支持各种分辨率的渲染,例如从左往右依次是常见的 720x1280, 1080x1920, 1920x1080, 1280x720 分辨率的渲染效果图。(可自行调整弹幕及 superchat 字体及渲染框大小)
推荐一些常见渲染参数:
- 720x1280
dmconvert -f 38 -sf 30 -x 720 -y 1280 -r 12 -ft 5 -i sample.xml -o output.ass - 1280x720
dmconvert -f 38 -sf 30 -x 1280 -y 720 -r 12 -ft 5 -i sample.xml -o output.ass - 1080x1920
dmconvert -f 42 -sf 42 -x 1080 -y 1920 -r 12 -ft 5 -i sample.xml -o output.ass - 1920x1080
dmconvert -f 42 -sf 42 -x 1920 -y 1080 -r 12 -ft 5 -i sample.xml -o output.ass
pip install dmconvertdmconvert -i sample.xml更多帮助通过 -h 参数查看:
dmconvert -h
# options:
#   -h, --help            show this help message and exit
#   -V, --version         Print version information
#   -fn FONTNAME, --fontname FONTNAME
#                         The font name of the danmaku, default is 'Microsoft YaHei'
#   -f FONTSIZE, --fontsize FONTSIZE
#                         The font size of the danmaku, default is 38
#   -sf SCFONTSIZE, --scfontsize SCFONTSIZE
#                         The font size of the superchat and gift, default is 38
#   -x RESOLUTIONX, --resolutionx RESOLUTIONX
#                         The resolution x of the danmaku, default is 1920
#   -y RESOLUTIONY, --resolutiony RESOLUTIONY
#                         The resolution y of the danmaku, default is 1080
#   -d DISPLAYAREA, --displayarea DISPLAYAREA
#                         The display area of the normal danmaku, default is 1.00. (0.00-1.00)
#   -r ROLL_TIME, --roll-time ROLL_TIME
#                         The show time of the rolling danmaku, default is 12
#   -ft FIX_TIME, --fix-time FIX_TIME
#                         The show time of the fix danmaku, default is 5
#   -a ALPHA, --alpha ALPHA
#                         The opacity value of the danmaku, default is 0.8. (0.0-1.0)
#   -b BOLD, --bold BOLD  The bold value of the danmaku, default is 0. [0,1]
#   -ol OUTLINE, --outline OUTLINE
#                         The outline width of the danmaku, default is 1.0
#   -sh SHADOW, --shadow SHADOW
#                         The shadow width of the danmaku, default is 0.0
#   -i XML, --xml XML     The input xml file
#   -o ASS, --ass ASS     The output ass file

# Example:
# dmconvert -i input.xml -o output.ass
# dmconvert -fn "Microsoft YaHei" -f 38 -sf 30 -x 1920 -y 1080 -d 1.0 -r 12 -ft 5 -a 0.8 -b 1 -ol 1.0 -sh 0.0 -i input.xml -o output.assfrom dmconvert import convert_xml_to_ass
# 例如
# xml_file = "sample.xml"
# ass_file = "sample.ass"
# font_size = 38
# sc_font_size = 30
# resolution_x = 720
# resolution_y = 1280
convert_xml_to_ass(font_size, sc_font_size, resolution_x, resolution_y, xml_file, ass_file)注意,以下内容是我的英文博客 Implement danmaku rendering algorithm from scratch直接翻译的,可能存在不准确的地方,以我英文文章为主。
这篇文章从零开始实现了一个弹幕渲染算法,并详细分析了弹幕渲染算法。源代码在 GitHub。
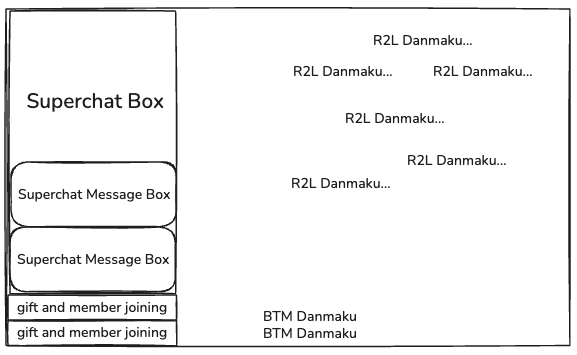
通常,一个弹幕渲染图像由以下组件组成:
- Superchat 消息
- 礼物消息(包括舰长等信息)
- 底部弹幕
- 滚动弹幕
那么,如何从零开始实现一个弹幕渲染算法呢?我们首先需要了解弹幕文件的主要格式。
首先,我们可以分析 XML 弹幕文件的结构。
<?xml version='1.0' encoding='utf-8'?>
<i>
    <chatserver>chat.bilibili.com</chatserver>
    <chatid>0</chatid>
    <mission>0</mission>
    <maxlimit>0</maxlimit>
    <state>0</state>
    <real_name>0</real_name>
    <source>e-r</source>
    <metadata>
        <user_name>user_name</user_name>
        <room_id>room_id</room_id>
        <room_title>room_title</room_title>
        <area>area</area>
        <parent_area>parent_area</parent_area>
        <live_start_time>2024-12-01T18:03:59+08:00</live_start_time>
        <record_start_time>2024-12-01T18:05:02+08:00</record_start_time>
    </metadata>
    <d p="0.000,1,25,5816798,1733047466414,0,73c9f86f,-1189105972" uid="0" user="X***">?</d>
    <d p="0.000,1,25,5816798,1733047471983,0,73c9f86f,-1054085047" uid="0" user="X***">good</d>
  </i>
XML 文件由以下两个主要元素组成:
- metadata: 包含直播房间或视频的信息
- d: 包含弹幕信息
元素的一般结构如下:
<d p=" 0.000,     1,    25,5816798,1733047466414,   0,   73c9f86f,-1189105972" uid="0" user="X***">?</d>
<d p="{time},{type},{size},{color},{timestamp},{pool},{uid_crc32},{row_id}" uid="{uid}" user="{user}">{text}</d>- time: 弹幕显示的时间
- type: 弹幕类型
- size: 弹幕大小,12 小,16 非常小,18 小,25 中等,36 大,45 非常大,64 巨大
- color: 弹幕的 十进制 RGB 颜色,例如十六进制:
#FFFFFF-> 十进制:16777215 - timestamp: 弹幕的时间戳
- pool: 弹幕池类型
- uid_crc32: 弹幕发送者的 uid 的 crc32 哈希值,用于忽略特定用户的弹幕
- row_id: 弹幕的行 id,用于历史弹幕
弹幕类型和弹幕池类型的关系:
| pool\type | 1 | 4 | 5 | 6 | 7 | 9 |
|---|---|---|---|---|---|---|
| 0 | roll | bottom | top | reverse | special1 | / |
| 1 | / | / | / | / | precise2 | / |
| 2 | / | / | / | / | / | bas |
SSA 是 Sub Station Alpha 的缩写,是一种用于许多视频播放器的字幕格式。它比 SRT 实现更复杂的字幕效果。
ASS 是 Advanced SubStation Alpha 的缩写,是 SSA 的 V4 版本。
ASS 文件3的基本结构如下:
[Script Info]
ScriptType: v4.00+
Collisions: Normal
PlayResX: 720
PlayResY: 1280
Timer: 100.0000
WrapStyle: 2
ScaledBorderAndShadow: yes

[V4+ Styles]
Format: Name, Fontname, Fontsize, PrimaryColour, SecondaryColour, OutlineColour, BackColour, Bold, Italic, Underline, StrikeOut, ScaleX, ScaleY, Spacing, Angle, BorderStyle, Outline, Shadow, Alignment, MarginL, MarginR, MarginV, Encoding

Style: R2L,Microsoft YaHei,38,&H4BFFFFFF,&H00FFFFFF,&H00000000,&H1E6A5149,0,0,0,0,100.00,100.00,0.00,0.00,1,0.0,1.0,8,0,0,0,1
Style: L2R,Microsoft YaHei,38,&H4BFFFFFF,&H00FFFFFF,&H00000000,&H1E6A5149,0,0,0,0,100.00,100.00,0.00,0.00,1,0.0,1.0,8,0,0,0,1
Style: TOP,Microsoft YaHei,38,&H4BFFFFFF,&H00FFFFFF,&H00000000,&H1E6A5149,0,0,0,0,100.00,100.00,0.00,0.00,1,0.0,1.0,8,0,0,0,1
Style: BTM,Microsoft YaHei,38,&H4BFFFFFF,&H00FFFFFF,&H00000000,&H1E6A5149,0,0,0,0,100.00,100.00,0.00,0.00,1,0.0,1.0,8,0,0,0,1
Style: SP,Microsoft YaHei,38,&H00FFFFFF,&H00FFFFFF,&H00000000,&H1E6A5149,0,0,0,0,100.00,100.00,0.00,0.00,1,0.0,1.0,7,0,0,0,1
Style: message_box,Microsoft YaHei,28,&H00FFFFFF,&H00FFFFFF,&H00000000,&H1E6A5149,0,0,0,0,100.00,100.00,0.00,0.00,1,0.0,0.7,7,0,0,0,1

[Events]
Format: Layer, Start, End, Style, Name, MarginL, MarginR, MarginV, Effect, Text
Dialogue: 0,0:00:00.00,0:00:12.00,R2L,,0000,0000,0000,,{\move(735,1,-15,1)}{\c&HDEC158}?
Dialogue: 0,0:00:00.00,0:00:12.00,R2L,,0000,0000,0000,,{\move(751,39,-31,39)}{\c&HDEC158}good
从上面的结构可以看出,ASS 文件由以下三个部分组成:
- [Script Info]
- [V4+ Styles]
- [Events]
[Script Info]
ScriptType: v4.00+  # The ass is the v4 version of the ssa
Collisions: Normal  # The collisions type
PlayResX: 720 # The X resolution of the video
PlayResY: 1280 # The Y resolution of the video
Timer: 100.0000 # This is a percentage, above 100 means the danmaku will display faster and faster.
WrapStyle: 2 # Whether to change lines, due to the bilibili restrictions, this value is always 2.
ScaledBorderAndShadow: yes # Whether to scale the border and shadow of the video with the resolution
在 [Script Info] 部分,关键且可更改的参数是:
- PlayResX: 视频的 X 分辨率,默认是 1920
- PlayResY: 视频的 Y 分辨率,默认是 1080
这部分是 [Events] 部分的一些预定义样式。
[V4+ Styles]
Format: Name, Fontname, Fontsize, PrimaryColour, SecondaryColour, OutlineColour, BackColour, Bold, Italic, Underline, StrikeOut, ScaleX, ScaleY, Spacing, Angle, BorderStyle, Outline, Shadow, Alignment, MarginL, MarginR, MarginV, Encoding

Style: R2L,Microsoft YaHei,38,&H4BFFFFFF,&H00FFFFFF,&H00000000,&H1E6A5149,0,0,0,0,100.00,100.00,0.00,0.00,1,0.0,1.0,8,0,0,0,1
Style: L2R,Microsoft YaHei,38,&H4BFFFFFF,&H00FFFFFF,&H00000000,&H1E6A5149,0,0,0,0,100.00,100.00,0.00,0.00,1,0.0,1.0,8,0,0,0,1
Style: TOP,Microsoft YaHei,38,&H4BFFFFFF,&H00FFFFFF,&H00000000,&H1E6A5149,0,0,0,0,100.00,100.00,0.00,0.00,1,0.0,1.0,8,0,0,0,1
Style: BTM,Microsoft YaHei,38,&H4BFFFFFF,&H00FFFFFF,&H00000000,&H1E6A5149,0,0,0,0,100.00,100.00,0.00,0.00,1,0.0,1.0,8,0,0,0,1
Style: SP,Microsoft YaHei,38,&H00FFFFFF,&H00FFFFFF,&H00000000,&H1E6A5149,0,0,0,0,100.00,100.00,0.00,0.00,1,0.0,1.0,7,0,0,0,1
Style: message_box,Microsoft YaHei,28,&H00FFFFFF,&H00FFFFFF,&H00000000,&H1E6A5149,0,0,0,0,100.00,100.00,0.00,0.00,1,0.0,0.7,7,0,0,0,1
大部分样式可以很容易理解。
在 [V4+ Styles] 部分,关键且可更改的参数是:
- Fontname: 字体名称,默认是
Microsoft YaHei - Fontsize: 字体大小,默认是
38 - MarginL: 左边距,默认是
0 - MarginR: 右边距,默认是
0 - MarginV: 垂直边距,默认是
0
[Events]
Format: Layer,   Start,       End, Style, Name, MarginL, MarginR, MarginV, Effect, Text
Dialogue: 0,0:00:00.00,0:00:12.00,   R2L,     ,    0000,    0000,    0000,       ,{\move(735,1,-15,1)}{\c&HDEC158}?
Dialogue: 0,0:00:00.00,0:00:12.00,   R2L,     ,    0000,    0000,    0000,       ,{\move(751,39,-31,39)}{\c&HDEC158}good
在 [Events] 部分,关键且可更改的参数是:
- Layer: 弹幕的层级
- Start: 弹幕的开始时间
- End: 弹幕的结束时间
- Style: 弹幕的样式,例如
R2L或BTM - Name, MarginL, MarginR, MarginV, Effect: 总是为空
关于 Layer 参数:
R2L弹幕和Superchat弹幕在层级0。BTM弹幕和gift弹幕在层级1。
关于 Start 和 End 时间:
- 默认滚动时间为 12 秒。
BTM弹幕的固定时间为 5 秒。
关于 Style 参数:
R2L: 从右到左,对应 XML 文件中的1弹幕类型。BTM: 从下到上,对应 XML 文件中的4弹幕类型。message_box: 消息框,对应 XML 文件中的<sc>或<gift>。
接下来,我将分析具体的弹幕转换算法。
XML 文件如下:
<d p=" 0.000,     1,    25,5816798,1733047466414,   0,   73c9f86f,-1189105972" uid="0" user="X***">?</d>
<d p="837.163,    4,    25,5816798,1732882824163,   0,   f201ec3c,51587109" uid="0" user="S***">what?</d>
<d p="{time},{type},{size},{color},{timestamp},{pool},{uid_crc32},{row_id}" uid="{uid}" user="{user}">{text}</d>
ASS 文件如下:
Format: Layer,   Start,       End, Style, Name, MarginL, MarginR, MarginV, Effect, Text
Dialogue: 0,0:00:00.00,0:00:12.00,   R2L,     ,    0000,    0000,    0000,       ,{\move(735,1,-15,1)}{\c&HDEC158}?
Dialogue: 1,0:13:57.16,0:14:02.16,   BTM,     ,    0000,    0000,    0000,       ,{\pos(960,1043)}{\c&HDEC158}what?
对于普通 R2L 和 BTM 弹幕,Layer 是 0。Start 时间是 XML 文件中的 time。End 时间是 XML 文件中的 time 加上 12 秒(可以更改)。Style 是 R2L 或 BTM。Name 为空。MarginL 为 0000。MarginR 为 0000。MarginV 为 0000。Effect 为空。
Text 是 XML 文件中的 text。它包含三个部分:
{\move(735,1,-15,1)}: Move Effect 用于 R2L 弹幕,这是弹幕的位置。括号内的第一个和第二个数字是弹幕的初始位置(x, y),第三个和第四个数字是弹幕的最终位置(x, y)。y应该相同。我将在下一节分析算法。{\pos(960,1043)}: Pos Effect 用于 BTM 弹幕,这是弹幕的位置。括号内的数字是弹幕的位置(x, y)。我将在下一节分析算法。{\c&HDEC158}: 弹幕的颜色,可以转换为十进制的color在 XML 文件中。text: 弹幕的文本。
Move Effect 是 R2L 弹幕最重要的部分。
基本算法是从初始位置和最终位置的弹幕。我们应该保持 y 位置相同。让我们先谈谈 x 位置。
- 初始位置:
(resolution.x + text_length/2, PositionY) - 最终位置:
(-1 * text_length / 2, PositionY)
那么如何得到 text_length 呢?
我们应该计算 cnt 每个字符的 UTF-8 编码长度。因此,我们使用 0xC0 来判断当前字节是否是多字节字符的开始,因为 110- ---- 是 0xC0,而 0x00 到 0x7F 是 ASCII 字符,是单字节字符。因此,第二个判断是它必须小于 0x80。如果不是 UTF-8 编码,我们在这里直接使用 strlen 函数。
因此,text_length 可以近似为以下公式:
text_length = cnt * int((fontSizeSet + (fontSizeInXml - 25)) / 1.2);
XML 文件中的 fontSizeInXml 是弹幕的 size。因此,在简单版本中,我们可以直接使用以下公式:
text_length = cnt * int((fontSizeSet) / 1.2);
那么我们应该如何安排 y 的位置呢?我们应该确保下一个弹幕不会与前一个弹幕重叠。
我认为我们可以回到当前弹幕和前一个弹幕之间的距离问题。为了避免追赶的情况,我们只需要确保同一轨道(例如 n)的下一个弹幕不能追赶前一个弹幕(例如 n-1),从而确保它不能间接追赶 n-2。如果它可以追赶,我们应该比较下一个轨道中的下一个弹幕数据。
首先,每个弹幕的总距离是固定的,即 text_length + resolution.X。然后滚动时间固定,我认为默认时间是 12 秒,所以我们可以计算每个弹幕的速度 V_i,每个轨道只需要存储最后一个弹幕的开始时间 start_time 和弹幕的长度 length。
然后我们需要确定下一个弹幕 B 是否可以追赶前一个弹幕 A,首先,我们需要计算距离差 Delta_X。即,Delta_X = (start_time_B - start_time_A) × V_a - text_length_A / 2 - text_length_B / 2。当然,出于美学原因,可以保留一定的距离。然后,我们判断这个距离是否可以在剩余时间内覆盖。速度差是 Delta_V = V_B - V_A,追赶所需的近似时间可以计算为 Delta_T = Delta_X / Delta_V。我们只需要确保 Start_time_B - Start_time_A > Delta_T 以确保两个弹幕不会重叠。
因此,实际上只需要一个数组和一个公式。当然,在大量弹幕的情况下,重叠仍然可能发生。因此,还需要一个回退策略。这个回退策略非常简单。我们只需要在每次比较时添加一个标志来保存具有最大负时间差的轨道编号。这样,即使有追赶的情况,弹幕也会在弹幕区域的最右侧相遇。在大量弹幕的情况下,观看体验仍然可以得到保证。这种方法在极端情况下可以理论上容纳更多的非重叠弹幕。
def get_position_y(font_size, appear_time, text_length, resolution_x, roll_time, array):
    velocity = (text_length + resolution_x) / roll_time
    best_row = 0
    best_bias = float("-inf")
    for i in range(array.rows):
        previous_appear_time = array.get_time(i)
        if previous_appear_time < 0:
            array.set_time_length(i, appear_time, text_length)
            return 1 + i * font_size
        previous_length = array.get_length(i)
        previous_velocity = (previous_length + resolution_x) / roll_time
        delta_velocity = velocity - previous_velocity
        # abs_velocity = abs(delta_velocity)
        # The initial difference length
        delta_x = (appear_time - previous_appear_time) * previous_velocity - (
            previous_length + text_length
        ) / 2
        # If the initial difference length is negative, which means overlapped. Skip.
        if delta_x < 0:
            continue
        if delta_velocity <= 0:
            array.set_time_length(i, appear_time, text_length)
            return 1 + i * font_size
        delta_time = delta_x / delta_velocity
        bias = appear_time - previous_appear_time - delta_time
        if bias > 0:
            array.set_time_length(i, appear_time, text_length)
            return 1 + i * font_size
        else:
            if bias > best_bias:
                best_bias = bias
                best_row = i
return 1 + best_row * font_sizepos 效果是 BTM 弹幕最重要的部分。由于每个弹幕的显示时间约为 5 秒,因此我们应该确保该单个弹幕在此期间不会重叠。如果有其他弹幕在此期间,我们应该将新生成的弹幕向上移动。因此,我们的核心算法是获取弹幕的 PositionY 如下:
# Bottom danmaku algorithm
def get_fixed_y(font_size, appear_time, resolution_y, array):
    best_row = 0
    best_bias = -1 # record the best bias
    for i in range(array.rows):
        previous_appear_time = array.get_time(i)
        if previous_appear_time < 0:
            array.set_time_length(i, appear_time, 0)
            return resolution_y - font_size * (i + 1) + 1 # return the bottom line of the screen.
        else:
            delta_time = appear_time - previous_appear_time
            # if the time gap is larger than 5 seconds(the previous danmaku display time is over),
            if delta_time > 5:
                # we can move the new danmaku to this line.
                array.set_time_length(i, appear_time, 0)
                return resolution_y - font_size * (i + 1) + 1
            else:
                # if the time gap is less than 5 seconds, we can record this bias and row num,
                # then continue to the next epoch.
                if delta_time > best_bias:
                    best_bias = delta_time
                    best_row = i
    return resolution_y - font_size * (best_row + 1) + 1 # return the best line in the screen.
Superchat XML 格式如下:
<sc ts="50.000" uid="the_user_id" user="the_user_name" price="30" time="60">This is a superchat</sc>ts: 付费留言出现的时间。uid: 用户 id。user: 用户名。price: 付费留言的价格。time: 付费留言的显示时间。
对于不同的价格,付费留言会有不同的显示时间和字数限制。具体规则如下4:
| 价格(¥) | 价格范围 | 显示时长 | 中文字数限制 |
|---|---|---|---|
| 30 | 30≤ 价格 <50 | 60s | 40 |
| 50 | 50≤ 价格 <100 | 2min | 50 |
| 100 | 100≤ 价格 <500 | 5min | 60 |
| 500 | 500≤ 价格 <1000 | 30min | 80 |
| 1000 | 1000≤ 价格 <2000 | 1h | 90 |
| 2000 | 价格 ≥2000 | 2h | 100 |
ASS 文件如下:
Dialogue: 0,0:00:59.20,0:01:10.00,message_box,,0000,0000,0000,,{\pos(20,826.0)\c&HFFF5ED\p1\bord0\shad0}m 0 19 b 0 9.5 9.5 0 19 0 l 481 0 b 490.5 0 500 9.5 500 19 l 500 78 l 0 78
Dialogue: 0,0:00:59.20,0:01:10.00,message_box,,0000,0000,0000,,{\pos(20,904.0)\p1\c&HB2602A\bord0\shad0}m 0 0 l 500 0 l 500 29 b 500 38.5 490.5 48 481 48 l 19 48 b 9.5 48 0  38.5 0 29
Dialogue: 1,0:00:59.20,0:01:10.00,message_box,,0000,0000,0000,,{\pos(20,832.0)\c&H653617\b1\bord0\shad0}The user name
Dialogue: 1,0:00:59.20,0:01:10.00,message_box,,0000,0000,0000,,{\pos(20,870.0)\c&H313131\fs30\bord0\shad0}SuperChat CNY 30
Dialogue: 1,0:00:59.20,0:01:10.00,message_box,,0000,0000,0000,,{\pos(20,904.0)\c&HFFFFFF\bord0\shad0}The display time of the superchat.
每个付费留言消息框由 5 部分组成:
- 上框
- 下框
- 用户名
- 价格
- 付费留言文本
对于上框和下框参数,我不会在这里展示它们,如果你感兴趣,可以参考我的仓库中的 draw_lower_box 和 draw_upper_box 函数,许多绘图参数参考了 DanmakuFactory5,非常感谢作者。在这里我想谈谈如何根据其他付费留言的出现和消失来移动付费留言消息框。
我们可以看到,付费留言按照时间顺序出现和消失,那么我们如何在特定时间点定义付费留言的位置呢?
我的解决方案是:每次付费留言在其生命周期中改变位置时计算付费留言消息框的位置。具体的算法如下:
def render_superchat(ass_file, sc_font_size, resolution_y, data):
    """
    Render superchat events to the ass file.

    Args:
        ass_file (str): The path to the ass file.
        sc_font_size (int): The superchat font size, which is used to calculate some render parameters.
        resolution_y (int): The resolution y, which is used to calculate the initial y coordinate.
        data (list): The data to render, which is a list of superchat events.
    """
    # get all events
    events = []
    for i, (
        start,
        end,
        sc_height,
        user_name,
        price,
        text,
        btm_box_height,
        process_record,
    ) in enumerate(data):
        events.append((start, "start", i))
        events.append((end, "end", i))

    # sort events by time
    events.sort()

    # still alive
    active = []

    # process each event
    for time, event_type, index in events:
        current_start = data[index][0]
        current_end = data[index][1]
        # if it is a start event, new superchat appears
        if event_type == "start":
            for active_index in active:
                active_start = data[active_index][0]
                active_end = data[active_index][1]
                # if the current superchat appears in the duration of the active superchat
                if active_start <= current_start < active_end:
                    # then it will record the height change of the active superchat
                    data[active_index][7] += f"-{data[index][2]}@{time} "
            active.append(index)
        else:
            # the superchat will disappear, so remove it from the active list first
            active.remove(index)
            # then check if the current superchat appears in the duration of the active superchat
            for active_index in active:
                active_start = data[active_index][0]
                active_end = data[active_index][1]
                if active_start <= current_start < active_end and time < active_end:
                    # if the current superchat disappears in the duration of the active superchat
                    # then record the height change.
                    data[active_index][7] += f"+{data[index][2]}@{time} "

    # then parse the result, and write the superchat to the ass file according to the result
    for i, (
        start,
        end,
        sc_height,
        user_name,
        price,
        text,
        btm_box_height,
        result,
    ) in enumerate(data):
        # print(f"\nSC {i} ({start}-{end}):")
        # Initial y coordinate
        previous_y = resolution_y - sc_font_size * 2
        current_y = previous_y - sc_height
        current_time = start
        # print(f"Time {start}: y = {current_y}, previous_y = {previous_y}")

        # if the position has changed
        if result:
            changes = result.strip().split()
            for change in changes:
                delta_y, time = change.split("@")
                prev_time = current_time
                current_time = float(time)
                # the shift height
                height_change = float(delta_y[1:])
                SuperChat(
                    prev_time,
                    current_time,
                    user_name,
                    price,
                    btm_box_height,
                    current_y,
                    previous_y,
                    text,
                    sc_font_size,
                ).write_superchat(ass_file)
                previous_y = current_y
                if delta_y[0] == "-":
                    current_y -= height_change
                else:
                    current_y += height_change
                # print(f"Time {time}: y = {current_y}, previous_y = {previous_y}")
        prev_time = current_time
        current_time = end
        SuperChat(
            prev_time,
            current_time,
            user_name,
            price,
            btm_box_height,
            current_y,
            previous_y,
            text,
            sc_font_size,
        ).write_superchat(ass_file)
这里我取消了 print 的注释,你可以看到 sample.xml 的 sc 的排列结果如下:
SC 0 (10.0-70.0):
Time 10.0: y = 1078, previous_y = 1204
Time 50.0: y = 952.0, previous_y = 1078
Time 59.0: y = 826.0, previous_y = 952.0

SC 1 (50.0-110.0):
Time 50.0: y = 1078, previous_y = 1204
Time 59.0: y = 952.0, previous_y = 1078

SC 2 (59.0-119.0):
Time 59.0: y = 1078, previous_y = 1204

SC 3 (185.0-245.0):
Time 185.0: y = 1040, previous_y = 1204
Time 217.0: y = 914.0, previous_y = 1040

SC 4 (217.0-337.0):
Time 217.0: y = 1078, previous_y = 1204
Time 269.0: y = 914.0, previous_y = 1078
Time 303.0: y = 712.0, previous_y = 914.0
Time 329.0: y = 876.0, previous_y = 712.0

SC 5 (269.0-329.0):
Time 269.0: y = 1040, previous_y = 1204
Time 303.0: y = 838.0, previous_y = 1040

SC 6 (303.0-363.0):
Time 303.0: y = 1002, previous_y = 1204
我们现在知道了每个时间点的 sc 的准确位置,所以我们可以很容易地在 ASS 文件中渲染它们。
但是,这些是最好的显示吗?我认为不是。如果我们只考虑位置,视频会太无聊,所以我们应该给付费留言的出现添加一些动画。想想付费留言就像一个气泡,它会根据其他付费留言的出现和消失而上下移动。图片会更适合观众。
现在我们可以思考气泡移动效果的算法。正如我们上面讨论的那样,这种移动可以通过 move 效果来实现。
首先,新的付费留言会在屏幕底部出现,所以初始 y 位置是 resolution_y - font_size * 2(我们应该为礼物弹幕保留一些空间,我将在下一节介绍它们)。付费留言的出现位置将是初始 y + 消息框高度。
然后,新的付费留言如何影响其他仍然存在的付费留言?在特定时间点,其他付费留言会向上移动新的付费留言高度。所以移动参数将是 current_y 到 current_y - new_superchat_height。
如果存在一个特定的付费留言消失,那么比它更早的付费留言将向下移动付费留言高度。所以移动参数将是 current_y 到 current_y + disappear_superchat_height。然后一切都变得有意义了。
然后我们应该思考,什么时候开始移动?会有很多解决方案,但我认为在付费留言改变位置的时间点开始移动是最好的选择。并使移动持续一段时间,比如 0.2 秒。
所以过程将是:
- 改变位置时间 + 0.2s: 使付费留言移动效果。
- 改变位置时间 + 0.2s ~ 下一个改变位置时间: 使付费留言 pos 效果。
你可以参考源码中的 superchat.py 文件,了解具体的实现。
XML 文件如下:
    <!-->gift danmaku<-->
    <gift ts="11.00"    uid="0"      user="xxx"         giftname="情书"         giftcount="1" cointype="金瓜子" price="5200"/>
    <gift ts="13.00"    uid="0"      user="yyy"         giftname="小花花"       giftcount="1" cointype="金瓜子" price="100"/>
    <gift ts="{time}"   uid="{uid}"  user="{username}"  giftname="{giftname}"   giftcount="{count}" cointype="金瓜子" price="{price}"/>

    <!-->all guard danmaku<-->
    <guard ts="18.000" uid="873268" user="xxx" giftname="舰长" count="1" price="198000" level="3"/>
    <guard ts="18.000" uid="873268" user="yyy" giftname="提督" count="1" price="1998000" level="2"/>
    <guard ts="18.000" uid="873268" user="zzz" giftname="总督" count="1" price="19998000" level="1  "/>
    <guard ts="{time}" uid="{uid}" user="{username}" giftname="{giftname}" count="{count}" price="{price}"
    level="{level}"/>
ASS 文件如下:
Format: Layer,     Start,       End,      Style, Name, MarginL, MarginR, MarginV, Effect, Text
Dialogue:   0,0:00:00.20,0:00:02.00,message_box,     ,    0000,    0000,    0000,,{\pos(0,1242)}{\c&H1C7795\b1}{username}:{\c&H1C7795\b0} 粉丝团灯牌 x1
设置图层为 0,开始时间为 xml 中的 time,结束时间为 time + 持续时间,样式为 message_box,名称留空,左边距为 0000,右边距为 0000,上下边距为 0000,效果为 \pos 或 \move,文本为礼物消息。\move 和 \pos 与上面相同。b1 和 b0 是字体粗体的开始和结束,&H1C7795 是字体颜色。
礼物弹幕和舰队弹幕会放在一个盒子范围内显示,盒子的高度为两个字体大小。礼物和舰长弹幕从下往上滚动,超出个数会将最早的弹幕向上移除。
解析xml,将xml中包含"gift"、"guard"的部分找到,信息存储到gift_list中。根据这些信息计算礼物的显示时间和位置并输出ass文件。
需要注意的地方有:
-
合并相邻的相同弹幕
- 将所有
gift按照出现时间排升序。然后将gift_list中相邻的相同弹幕合并。 - 相邻的相同弹幕的定义为:同一用户、同一礼物、相邻时间不超过
mrege_interval(默认5s,可配置)。合并后的开始时间是最早弹幕的开始时间,结束时间是最晚弹幕的结束时间。
- 将所有
-
处理相同时间的不同弹幕
- 由于不同用户的弹幕开始时间可能会相同,导致显示冲突,因此需要调整弹幕的时间以避免冲突。
- 按时间顺序遍历所有弹幕,若发现某个礼物弹幕的开始时间与上一个相同或更早,则将该弹幕的开始时间后延,结束时间也相应后延。后延到最大个数结束。
- 需要注意的点是:由于相邻礼物弹幕的时间间隔最小是1s,所以后延的弹幕个数乘以后延的时间不能超过1s。
-
处理礼物弹幕的显示时间和位置
- 在输出时,礼物弹幕的显示时间和位置需要根据
/pos的结束时间来调整,但若在最终结束时间前有新的弹幕加入,则/pos需提前结束。 - 为了实现这一调整,我们在该弹幕即将结束前,检查后续是否有弹幕的开始时间早于当前礼物弹幕的结束时间。如果有,则将当前礼物弹幕的结束时间提前到该弹幕的开始时间。
- 使用一个活跃弹幕列表
active_danmaku_list来记录当前正在显示的弹幕。列表长度不应超过设定的最大弹幕显示个数。当列表长度超过限制时,应删除最早的弹幕。
- 在输出时,礼物弹幕的显示时间和位置需要根据
-
弹幕的显示和移动过渡
- 弹幕移动过渡:在每个
/pos()前预留一段过渡时间,用于从上一个位置平滑过渡到当前/pos()位置。该过渡时间可以进行配置。 - 对于超出显示范围的弹幕,在移出时需要添加一个蒙版
\clip(),使得弹幕只显示蒙版内的内容。蒙版的高度应等于显示盒子的高度,或者两个字体的高度。
- 弹幕移动过渡:在每个
Footnotes
-
special means:
[{x1(0-1)|(px)},{y1},"{Aplha0(0-1)}-{Alpha1}",{Lifetime},"{Text}",{Z_Rotation},{Y_Rotation},{x2},{y2},{Move_Time(ms)},{Delay_Time(ms)},{Outline[01]},"{Fontname}",{Linear_Speedup[01]},["SVG_Path"]]↩ -
precise means:
[{x1(0-1)|(px)},{y1},"{Aplha0(0-1)}-{Alpha1}",{Lifetime},"{Text}",{Z_Rotation},{Y_Rotation},{x2},{y2},{Move_Time(ms)},{Delay_Time(ms)},{Outline[01]},"{Fontname}",{Linear_Speedup(Bool)}]↩ -
https://web.archive.org/web/20210604141133/https://www.douban.com/note/658520175/ ↩
-
https://live.bilibili.com/blackboard/live-superchat-intro-web.html ↩