Wechsle Sprache zu DE: 🇩🇪 Deutsch
A LAN/Web Remote Rig Control System for the Albrecht AE-5900 radio, simulating the AMM-500 microphone. This allows the AE5900 to be operated via a web browser in a webinterface.
WARNING!!! There is a risk that using this equipment may be illegal, depending on the laws of your country. Consider this with your conscience. I'm not your mother!
Development of a sophisticated LAN/web remote control for the Albrecht AE-5900. Ultimately, the purpose is also to revive CB radio and make it more attractive. Flexible solutions provide better access. And that's exactly what this project should enable.
- A screenshot of the current UI, in the browser, on your smartphone

- Visual audio feedback
- Adjustable microphone volume
- Optimized scan function with adjustable speed
- Clarifier
- Lock
- Mute
- Vox
- MW (multi chanel scan)
- Squelch // Autosquelch
- PTT kill switch activates after 30 seconds following connection loss.
- Own roger beeps. Just add them to folder beeps.
- Physically PTT key / Special key on phone or keyboard
- Country codes must be set in the web interface and on the device.
- Hamlib/Rigctl compatible (flrig, fldigi, rigctl, grig, openwebrx, js8call & wsjt-cb)
- If you decide to open and solder the device, extrenal S-METER can now be used via Bluetooth.
- Various features are demonstrated here. Operable via multiple software and devices simultaneously. Also rigctl and hamlib is implemented and a bluetooth s-meter.
- A photo of the newest prototype without jack conector. All audio & control over RJ45.

- Connect the custom device to a Raspberry Pi or another host computer on which the Python script can be executed. This device then serves as a server.
- Connect the Adapter to Mic Port of AE5900.
- You have to plug a jack plug into the PA/EXT output as a dummy to silence the speaker.
- Increase the output volume of the AE5900 from 0 to about 75% on the volume control.
- Ensure proper grounding to prevent rf.
- Ideally, the AE5900 is already set to FM and channel 1.
- Set your AE5900 microphone to TYPE 2, set your P1 - P4 key shortcuts. I use P1 ASQ / P2 VOX / P3 MUTE
- Start Mumble on the host computer and your device (phone/laptop, etc.)
- Run
python3 ae_5900_v2.pyon the host/server. - Open
HOSTNAMEIP:5000in your browser on the device. You should now have control of your AE5900. - Open Setup at the bottom of the WebUI and run Sync.
- Set the appropriate labels for the P1 to P4 buttons as you have set them on the AE5900.
- On the host computer, you may need to make adjustments in the volume control (pavucontrol). Typical adjustments would be: Menu item "Configuration" default sound card your network-connected sound card.
- On the host computer in Mumble, PulseAudio and Standard/Default can now be used for input and output. Audio input: Transmission should be set to continuous, quality to about 44kb/s.
The script is currently designed for ALL region. VFO mode will follow.
That's basically it, and anyone who's not completely clueless should be able to figure it out.
- Reading comprehension skills
- Understanding skills
- Implementation skills
- Soldering experience
- Raspberry Pi 3
- Some spare cash for parts
With pictures and everything you need to know.
- First, the components for the audio filter and what you can use for building. Most of it I had in my parts box.
For the audio filters we use:
- 1x 600:600 Ohm transformers
- 1x 100 Ohm resistor
- 1x 10 kOhm resistor
- 1x 10nF ceramic capacitor (103) (at least one to filter the RF)
- 1x 10µF electrolytic capacitor (approx. 16 - 50v)
Remaining components:
- USB breakout board or a hub
- FT232RL FT232 FTDI USB 3.3V 5.5V to TTL serial adapter
- USB soundcard
- RJ45 terminal
- A metal enclosure

- I've drawn you a nice picture. It might look like it was drawn by a three-year-old, but any hobbyist and soldering iron owner should be able to understand it.

You can, of course, simply plug the USB devices into a USB hub, but where's the fun in building something "as small as possible"? You still have to solder the two filters, though.
The AMM-500 sends hex codes serially to the AE-5900 and the AE-5900 responds accordingly. This makes a lot possible. To make the build work, I had to listen in between the two devices. Principle: Man in the middle.
Since the AE-5900 itself only releases its codes after a handshake with the AMM-500, this had to be purchased and eagerly awaited.
Mumble & Mumble Server for audio transmission (audio chat)
Tailscale on all devices used for this project. When operating on a local network, Tailscale can be omitted. Tailscale is free for private users but requires an account.
For those who prefer a more relaxed approach, using a fresh Raspberry Pi Trixie image:
This block will first install the script and system updates on the Raspberry Pi. Then, everything necessary, such as Python, Mumble, audio, and Tailscale, will be installed. Finally, the settings in Mumble and the audio will be adjusted, and a simple autostart will be added. After restarting, Mumble will ask for the certificate and the database location. Now restart again, and everything is set up for the first test run.
Simply copy the entire block into the console.
git clone https://github.com/ThatCrazyDcGuy/AE5900_Remote_V2
cd ~/AE5900_Remote_V2/
sudo chmod +x install.sh
./install.sh
#If you want to use tailscale:
#Copy the created TailscaleLink into your browser and follow the instructions
rebootAll of the following settings relate to the host / server. My audio settings don't necessarily have to be yours. They serve merely as an example here.
- Pavucontrol:

- Mumble:

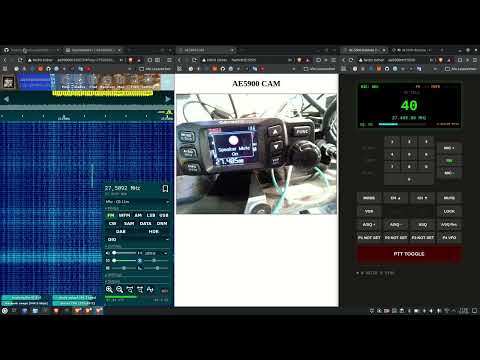
- Tutorial AE5900_REMOTE_V2: Activate VFO on device and WebUI.
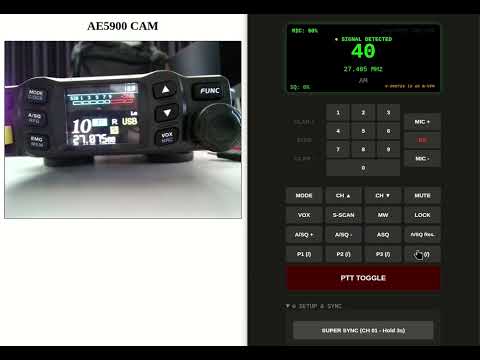
- Tutorial AE5900_REMOTE_V2: Setup and use Openwebrx to control ae5900
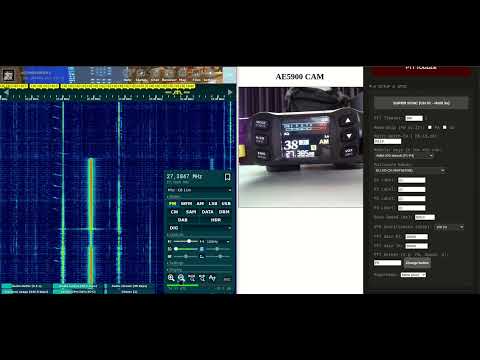
- Add PTT Code to openwebrx settings/general in Photo description edit (hostname/ip) and add:
<script type="text/javascript">
// === CONFIGURATION ===
// Enter the hostname or IP address of your Albrecht Pi below, after ALBRECHT_HOST = (e.g. 'ae5900ctrl' or '192.168.122.50')
var ALBRECHT_HOST = '127.0.0.1';
// =====================

if (document.getElementsByTagName('a')[0]) {
    document.getElementsByTagName('a')[0].innerHTML = '';
}

if (typeof window.owrxPttState === 'undefined') {
    window.owrxPttState = false;
}

if (!document.getElementById('owrx-cat-ptt')) {
    var pttBtn = document.createElement('button');
    pttBtn.id = 'owrx-cat-ptt';
    pttBtn.innerHTML = 'RX/TX';

    pttBtn.style.background = '#ADD8E6';
    pttBtn.style.color = '#fff';
    pttBtn.style.border = '1px solid #ff3333';
    pttBtn.style.padding = '5px 15px';
    pttBtn.style.marginLeft = '15px';
    pttBtn.style.cursor = 'pointer';
    pttBtn.style.fontWeight = 'bold';
    pttBtn.style.borderRadius = '4px';
    pttBtn.style.fontFamily = 'monospace';

    pttBtn.onclick = function() {
        window.owrxPttState = !window.owrxPttState;
        var pttVal = window.owrxPttState ? '1' : '0';

        fetch('http://' + ALBRECHT_HOST + ':5000/api/rig/ptt/' + pttVal, { mode: 'cors' })
            .then(function(r) { return r.text(); })
            .then(function(text) {
                if (window.owrxPttState) {
                    pttBtn.style.background = '#ff0000';
                    pttBtn.style.boxShadow = '0 0 10px red';
                    pttBtn.innerHTML = ' T X ';
                } else {
                    pttBtn.style.background = '#008000';
                    pttBtn.style.boxShadow = 'none';
                    pttBtn.innerHTML = ' R X ';
                }
            })
            .catch(function(err) {
                console.error('Albrecht API nicht erreichbar:', err);
                window.owrxPttState = !window.owrxPttState; // Reset on err
                pttBtn.innerHTML = 'API ERR';
            });
    };

    var firstLink = document.getElementsByTagName('a')[0];
    if (firstLink && firstLink.parentNode) {
        firstLink.parentNode.appendChild(pttBtn);
    }
}
</script>
- settings/reporting in RigControl settings add:

- settings/sdr in Profile settings add:

I was able to find the pinout for external s-meter. Instead of using another wire/output/plug i decided to use a esp32 wroom and now we have a s-meter ober bt.
Lets see some photos and screenshots here:


Code is available in the ino folder.
Pair device to you raspi/host by bluetoothctl / pair / trust / connect
Run once:
sudo rfcomm bind rfcomm0 EC:E3:34:46:D8:7E <- use your own mac here
echo "$USER ALL=(ALL) NOPASSWD: /usr/bin/rfcomm" | sudo tee /etc/sudoers.d/ae5900_rfcomm && sudo chmod 0440 /etc/sudoers.d/ae5900_rfcomm
Have fun!
It's a good idea to run a WebSDR at home to check your installation if necessary (channel/modulation).
A good WebSDR can be easily set up with OpenWebRX, a Raspberry Pi, an RTL-SDR dongle (e.g., RTL-SDR Blog V3 or V4 / Nooelec NESDR V5), and an antenna.
Check out OpenwebrxPlus: https://luarvique.github.io/ppa/ RTL-SDR Blog v4: https://www.rtl-sdr.com/v4/
-
There's always something missing. What isn't there, will come later.
-
....
Current: V-120726 BTVO
- S-Meter over BT option
- More stable VFO
- CH50 bugfix
Previous version: V-090726 i3/a6 B-VFO
- VFO Mode added.
- Video tutorials added
- Some bugfixes in UI
Previous version: V-050426 i1/a9 RIGC
-
hamctl/rigctl functions added. install dependencies (sudo apt install libhamlib-utils)
-
Openwebrx TX-Button is available in openwebrx_ptt_code.txt // copy/paste ready.
-
New install.sh added.
Previous version: V-300626 i4/a1 DSPx
- Automatic adjustment to the display size between smartphone and computer.
Previous version: V-280626 i1/a1 BF
- Bugfixes für V-240626
Previous version: V-240626 i1/a4 JS8
- Reimplementation of JS8call control.
As trigger in JS8call in Radio / Rigoptions (will switch on/off automatically) use:
curl -s http://127.0.0.1:5000/api/cmd/TX?state=%1In other digimodes use for TX:
curl -s http://127.0.0.1:5000/api/cmd/TX?state=%1For RX:
curl -s http://127.0.0.1:5000/api/cmd/TX?state=%0Replace 127.0.0.1 with your ip. You can also build a on/off script with these commands.
- VOX bugfixes
Previous version: V-210626 i6/a9 BPLC
- ALL country codes added. Greetings to my testers in Poland and Great Britain.
- Again, some Bugfixes for FW 1.12 users.
Previous version: V-190626 i2/a5 CQRP
- New terminal keys can be selected and edited in Setup & Sync.
- Keys can be used to record and play back QSOs, as well as to record and repeat CQ calls. This function can be selected in Setup & Sync.
- Bugfixes
Previous version: V-170626 i4/a1 FLK
- Some bugfixes in UI.
- A/SQ level to display added. Please first use A/SQ Res. (will run about 25sec) then use the A/SQ +/- buttons.
- Ugly movement of buttons fixed.
Previous version: V-150626 i4/a5 BTN
- Button bugfixes.
Previous version: V-120626 i1/a1 LN-RB
- Roger beep switch added.
Previous version: V-110626 i9/a9 LNG
- The language of the manual under Setup & Sync changes according to the browser language setting.
Previous version: V-110626 i8/a9 VX-RB-SM-MW
- VOX function fixed.
- Rogebeep function implemented.
- Simulation mode added for testing without the box.
- MultiWatch fixed.
-
JS8Call works quite well with it. Of course, you have to play around with the settings a bit and enable VOX. But it should be simple to add a PTT function for the appropriate software.
-
User feedback from April 30, 2026: Linux Mint around version 21.3 and below don't understand the Python Vol- and Vol+. Just in case someone tests on such a system. A mint upgrade helps solve the problem.
Nothing more than my experience. I will not provide personal support. But I will upload some scripts, images, and ideas to share with others.
I am not a programmer, but I can read, understand, implement, and incorporate texts into my projects.
I take no responsibility for your builds. For my dear beta tester and me, both software and hardware work flawlessly. The audio received consistently good feedback in QSOs.
Special thanks going out to all the referring sites i've seen these days:
- blog.adafruit.com
- korben.info
- hackaday.com
- daily.dev
- radiowalkietalkie.com
- bingo01
- simonthewizard.com
Where the people talking about: