|
Google Analytics 4 is a new type of property which includes different reports than the ones Google has gotten us used to with Universal Analytics. Google Analytics 4 can be used for Websites, Apps or both at the same time, whereas Universal Analytics can only be used for Websites. In this day and age, information is key to pretty much everything, which means that keeping your existing Universal Analytics Property and setting up a new GA4-based property to run in parallel can elevate your information game to new heights and assure you make the most informed, data-driven decisions when steering your store into the future. Our extension helps open up this this new platform to Magento 2 with an integration that's easy to set up and deploy. It brings the powerful functionality and ease of use of our popular Google Analytics Enhanced eCommerce UA GTM Tracking extension to the GA4 platform so you can get ready for stepping into the future. Included in the Pearl Theme for Magento 2. |
- Track product impressions by position in the Category Page
- Track product clicks by position in the Category Page
- Track product impressions by position in the Search Result Page
- Track product clicks by position in the Search Result Page
- Track product impressions by position in the Related, Up-sell and Cross-sell section
- Track product clicks by position in the Related, Up-sell and Cross-sell section
- Track the number of times a product was added to the shopping cart
- Track the number of times a product was removed from the shopping cart
- Track the number of times a product was included into the checkout process
- Track each Checkout Step (billing address, shipping address, shipping options, payment options)
- Track purchases with or without shipping and tax fees
- Track coupon usage
- Track product Brand
- Track internal Promotion Impressions
- Track internal Promotion Clicks
- Internal Promotion Widget
- Child Vs Parent (Send Parent Id or Child id cart, checkout and thank you page)
- Multi Currency Ready
- GDPR compliant with native magento accept cookie functionality
- Multi Store Ready
- Varnish Cache Ready
- Full Page Cache Ready
- 8KB payload support
- Order Success Page Total Calculation (subtotal / grandtotal)
- Track Magento User ID
- Track user type (customer group)
- Google AdWords Remarketing Tracking
- Google AdWords Conversion Tracking
- Persistent Data Management
- Track product review count
- Track product review score
- Track stock status
- Track Sale products
- Track transactions by product variants (configurable product)
- Track transactions by product custom options
- Track custom dimension Page Type
- Track custom dimension Page Name
- Product level Custom Dimension / Metric sending (Send up to 5 product attributes to GTM)
-
Step 1:
Before installing please check the extension compatibility. This extension is currently compatible with the following Magento versions 2.0.X. - 2.4.X. It is recommended to install the extension first on a testing server before you install it on a live (production) server. -
Step 2:
Copy the extension files to below paths of your magento 2 instance. If ‘app/code/WeltPixel’ folder is missing, please create it manually: app/code/WeltPixel/Backend
app/code/WeltPixel/GA4 -
Step 3:
Copy the installation GUI folder 'weltpixel-extension-installation' in the root of your Magento installation. In some Magento configurations the public root folder may be under 'pub' directory.
www.yourmagentostore.com/weltpixel-extension-installation/
-
Step 4:
In your browser go to www.yourmagentostore.com/weltpixel-extension-installation/ and simply follow the installation steps from the graphical interface, presented in your browser. -
Step 5:
Wooohooo! The extension is now installed on your Magento store! Congrats!
Troubleshooting
Optional: Copy the extension files into the below path of your Magento 2 instance. If the ‘app/code/WeSupply’ folder
is missing, please create it manually:
app/code/WeSupply/Toolbox
If you experienced any issues or limitations with this quick GUI installation, see also SSH Installation below. SSH installation does the same thing but you are required to issue the commands step by step via CLI. Some servers may have high security configurations and may limit the functionality of this GUI Installer.
-
Step 1:
Before installing the Magento 2 Google Analytics 4 (GA4) With GTM Support on your store, please check the extension compatibility. This extension is currently compatible with the following Magento versions 2.0.X. - 2.4.X. It is recommended to install the extension first on a testing server before you install it on a live (production) server.
-
Step 2:
Copy the extension files to the paths of your Magento 2 instance listed below. If the ‘app/code/WeltPixel’ folder is missing, please create it manually:
app/code/WeltPixel/Backend
app/code/WeltPixel/GA4 -
Step 3:
Access the root of your Magento 2 project from the command line and run the following commands:
php bin/magento module:enable WeltPixel_Backend --clear-static-content
php bin/magento module:enable WeltPixel_GA4 --clear-static-content
php bin/magento setup:upgrade
php bin/magento setup:di:compile
php bin/magento setup:static-content:deploy -f -
Step 4:
Flush any cache that you might still have enabled on your server or in Magento.
-
Step 5:
Woohoo, the extension is installed!
Optional:
Copy the extension files into the below path of your Magento 2 instance. If the ‘app/code/WeSupply’ folder
is missing, please create it manually:
app/code/WeSupply/Toolbox
- Step 1. Go to your Google Tag Manager account and remove all tags associated with this extension as new release may contain new tags or adjustments to existing tags. If not removed, tags will not be updated.
- Step 2. Step 2. Remove extension code under app/code/WeltPixel/GA4 before adding the new extension files. Extension may be refactored and old unused files may cause random issues so it's best to only keep the latest version of the files.
- Step 3. Follow normal installation instructions above.
- If the extension was purchased from the Magento Marketplace, follow the instructions in this article: How to install extension if purchased from the Magento Marketplace
- If asked for a license, follow the steps presented in section 7 of this article: License key for local / staging / development environment. Multi-store licensing.
-
Go to Admin > Store > Configuration > Sales > Google API > Google Analytics > and set this option to [ No ].
- Go to Admin > Store > Configuration > Sales > Google API > Google Adwords > and set this option to [ No ].
- Go to WeltPixel > Google Analytics 4 Ecommerce > General Configuration > Enable GA4 and set this option to [ Yes ].

-
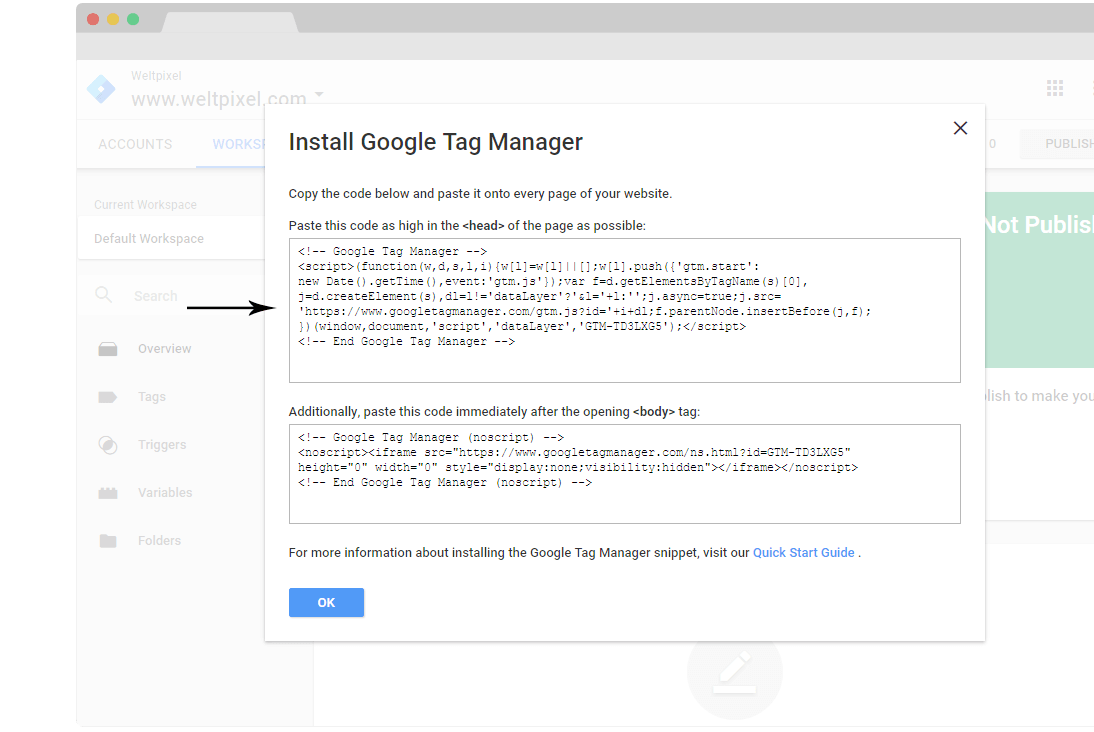
You need to create a Google Tag Manager account if you don’t have one already at this link:
- Setup Account name, Setup Container from yout Google Tag Manager like in the image.

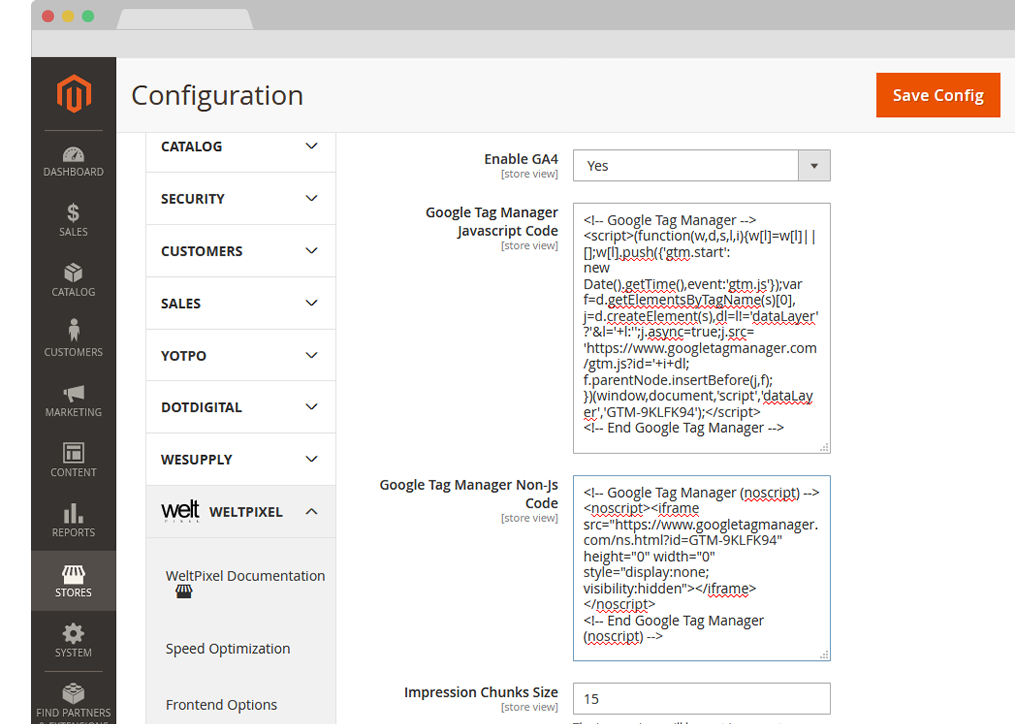
- Once the account is created get the Google Tag Manager (GTM) scripts in admin section of your Magento 2 store WeltPixel > Google Analytics 4 Ecommerce > General Configuration. You need also to get the code for the "" section.
- In Magento admin configure your Google Tag Manager (GTM) API Credentials in order to automatically link your store with your GTM account and create all default provided triggers automatically with one click.
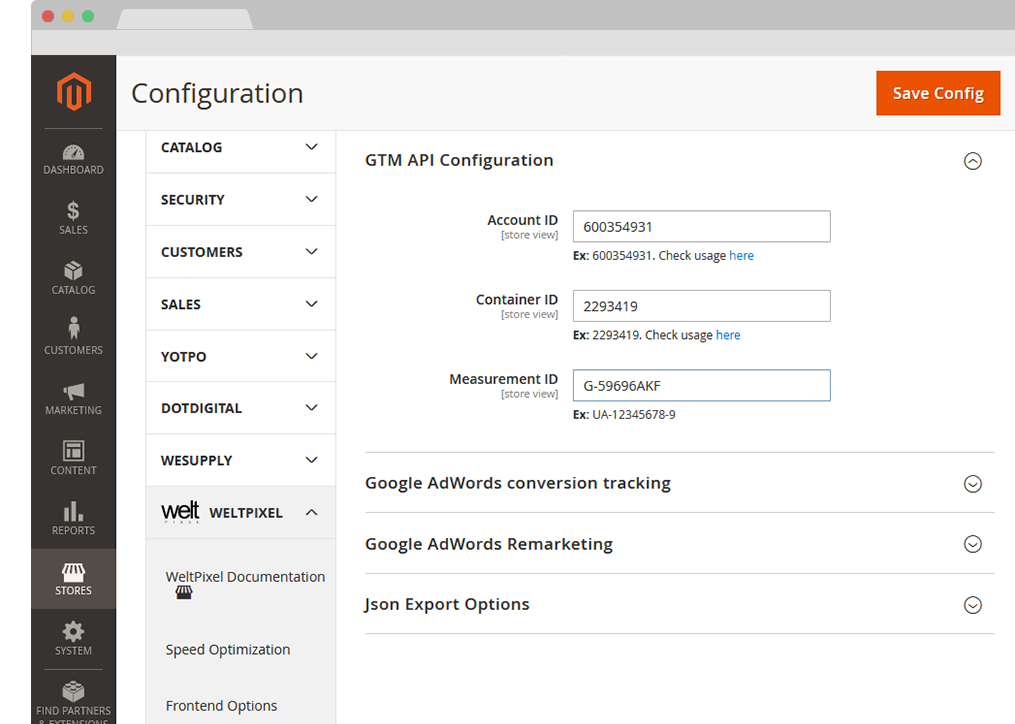
-
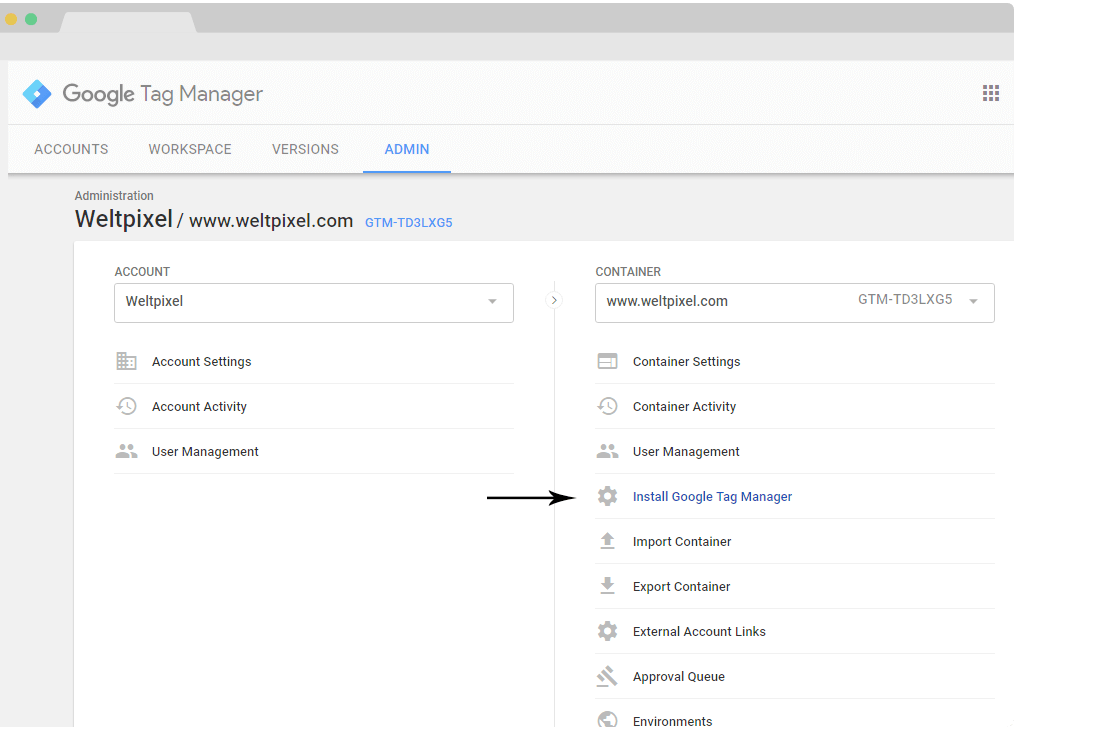
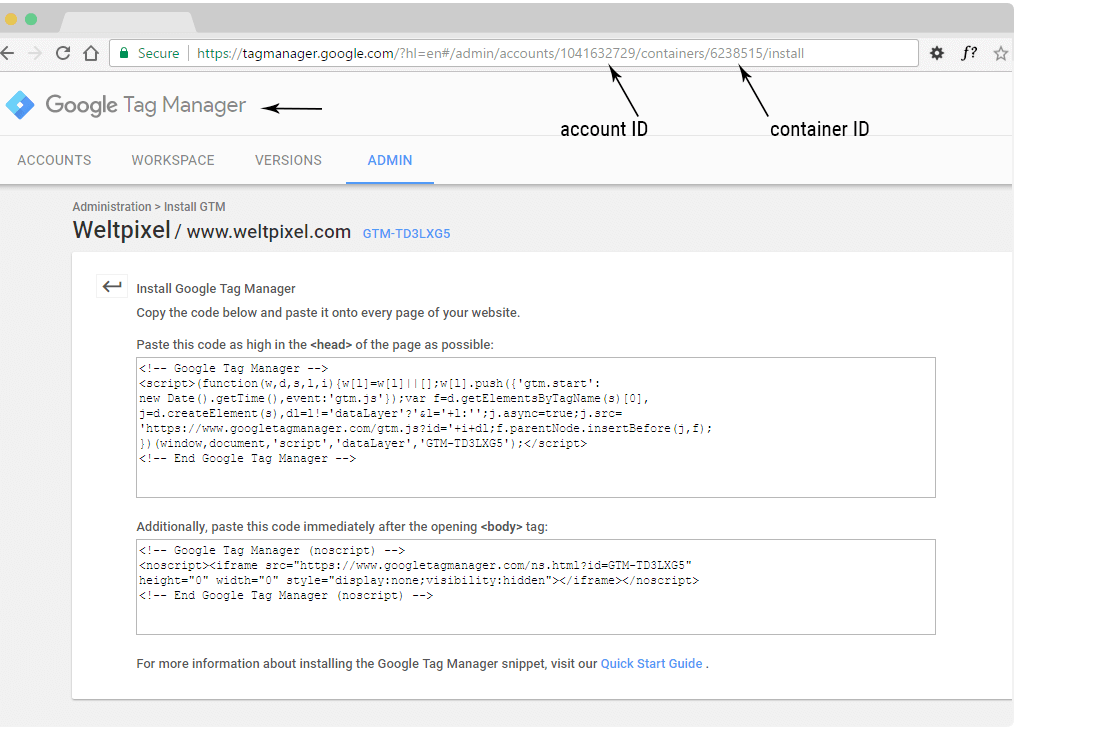
For this you need to go to WeltPixel > Google Analytics 4 Ecommerce > GTM API Configuration and fill in Account ID, Container ID, Universal Analytics Tracking ID. All this information can be found in your
Get information from Google Tag Manager and Google Analytics accounts. - a) Go to Google Tag Manager (GTM) Identify the IDs in your GTM account like in the picture.
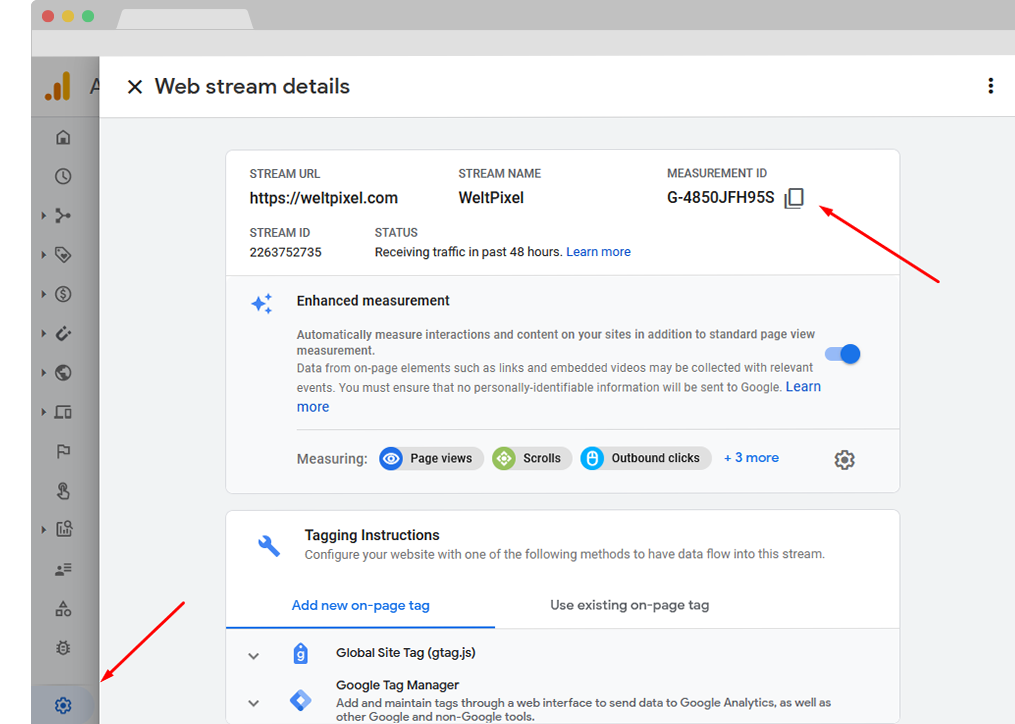
- b) Go to Google Analytics (GA) You can see how to get your Measurement ID from your Google Analytics account. The Measurement ID is available under GA account > Admin > Data Streams > *Select your Stream* > Measurement ID as you can see in the picture.
- Head back into your Magento Admin section and paste the Account ID, Container ID and Measurement ID into the GTM API Configuration section.
- Save the configuration.
-
The Tag, Trigger and variable generation works via a JSON generation process. The JSON is generated in Magento based on your settings, after which it's imported into Google Tag Manager.
Note: After making any extension configuration changes, remember to re-generate the JSON and re-import and overwrite the existing GTM container to ensure your settings are picked up by Google.
-
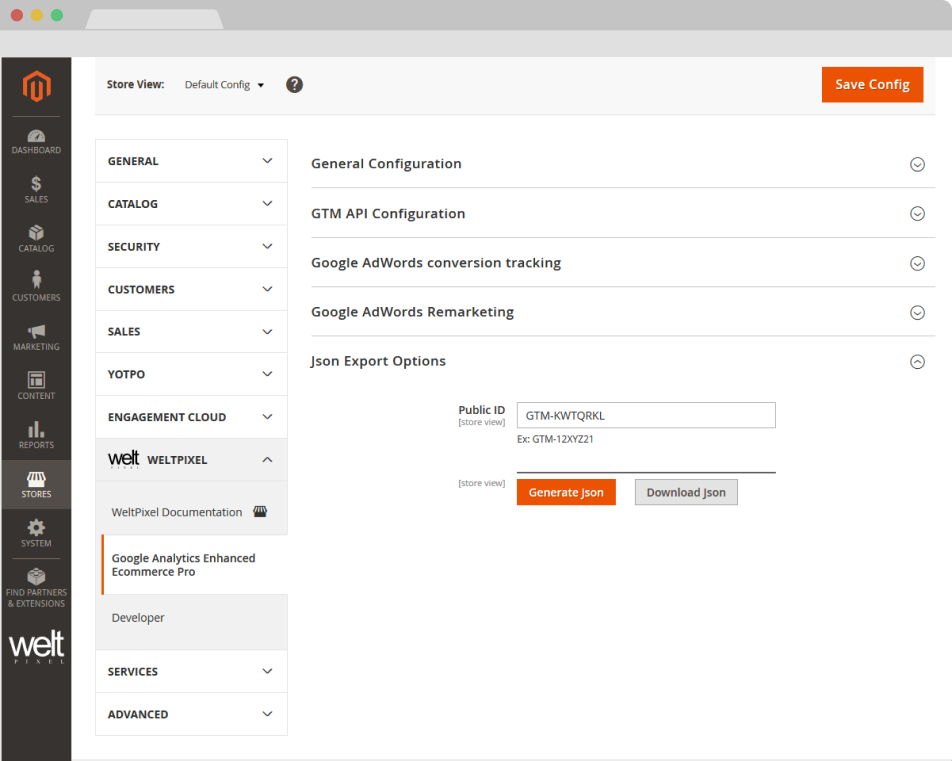
Go to WeltPixel > Google Analytics 4 Ecommerce > JSON Export Options fill in your Public ID (it can be found in your GTM account) and hit the Generate Json for Variables, Triggers and Tags button.
You will be notified that the JSON has been generated successfully and a Download JSON button will appear. Click the button to download the generated JSON.

-
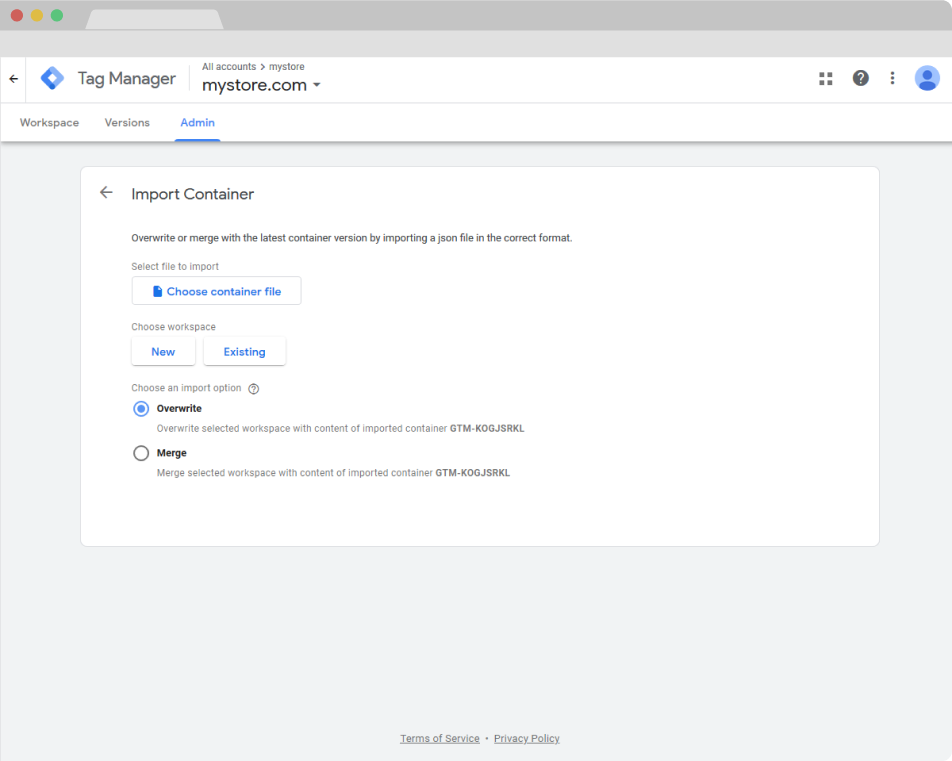
Click on the Choose container file button and find your previously generated and downloaded JSON file. Then, choose a workspace (you can choose an existing workspace or create a new one) and an import option.
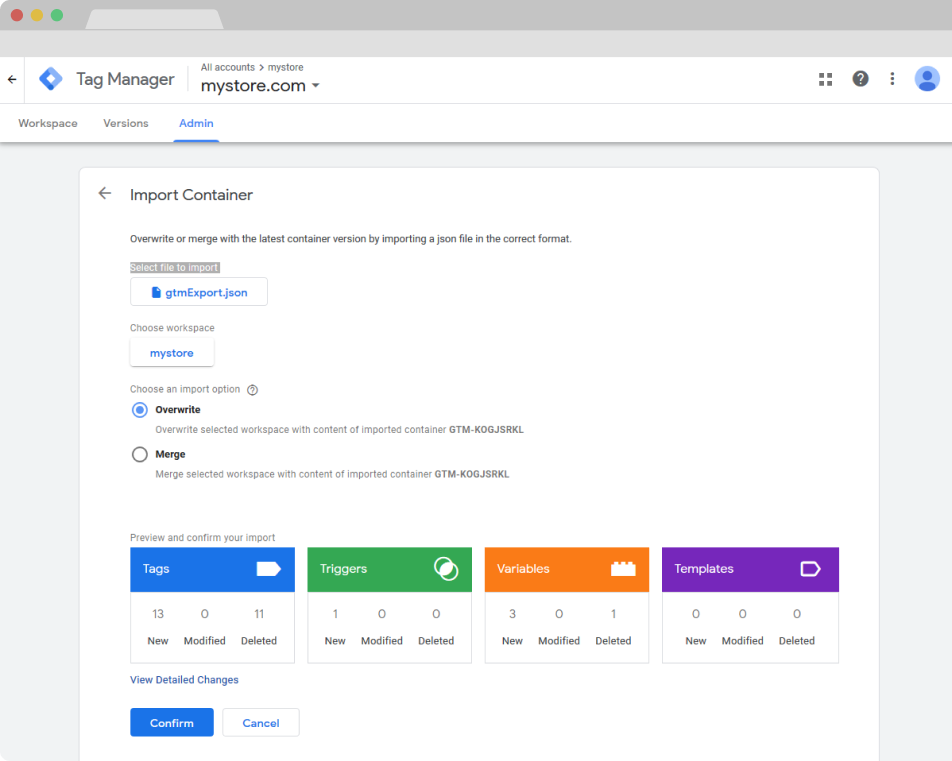
When importing your container, you will have the option to merge the imported content with the selected workspace, or overwrite the workspace entirely. Overwriting the selected workspace will remove all your existing tags, triggers and variables in that workspace, and will replace them with the imported container.
- After importing the generated JSON, a preview will show up letting you know the number of changes made to the container. There should be Tags, Triggers and Variables created or updated in various amounts depending on your Magento Admin settings. Click on Confirm and you should be done with importing your settings!
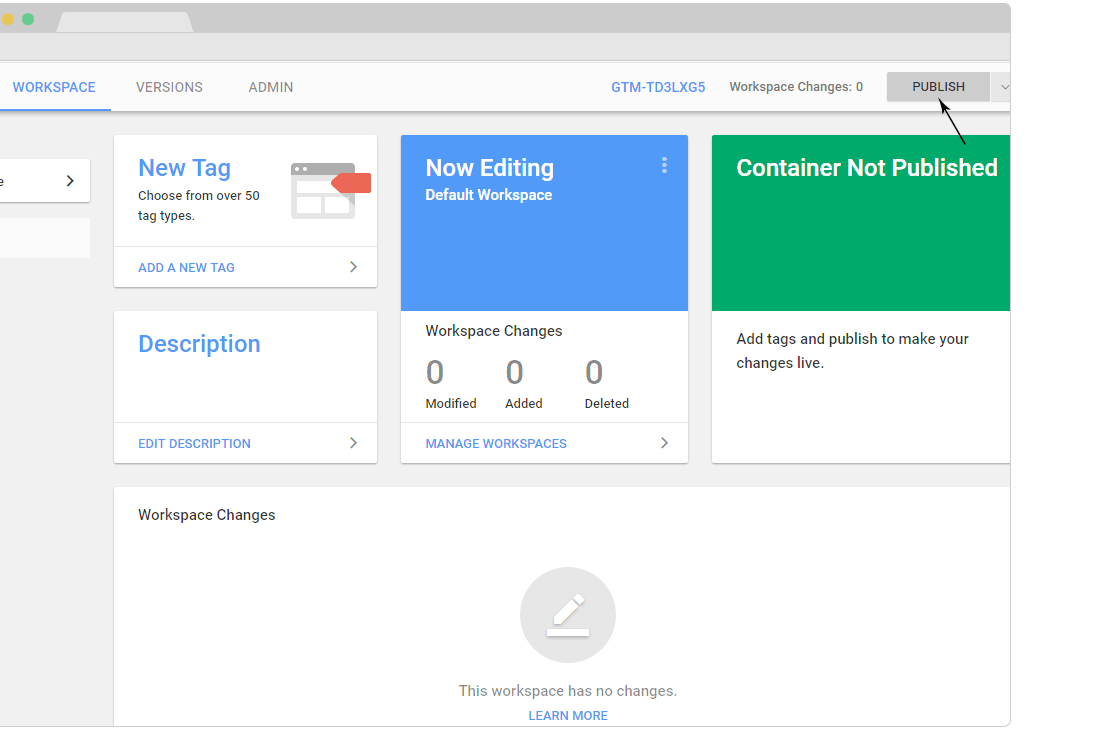
- After all your tags have been created in Google Tag Manager (GTM), go to Google Tag Manager (GTM) account and PUBLISH / SUBMIT all your tags by following the steps from Google Tag Manager.
- ! NOTE: If the container is not published/submitted in your GTM account, no tracking will be available. Make sure to publish your container.
- !! NOTE 2: Displaying statistics in your Google Analytics account based on tracked data could take from 30 minutes from 48 hours according to GTM Documentation. However, real time data should be visible right away if your account is correctly set up.
-
Woohoo, the extension is configured!
Note: Your GA and GTM account are now configured with our pre-generated settings and ready to receive valuable information from your Magento 2 store! You can now gather valuable data and take data driven decisions! Congrats!
Note 2: If you would like to receive even more personalized tracking data, you can always extend your GTM and GA default configurations from your account. If you would like our Google Certified Specialists to help you with that please contact our support for a quote.
- Google Tag Manager Javascript Code Position [ In the head tag / Before body close tag ] - choose position where Javascript code to be inserted. Default: In the head tag.
- Impression Chunks Size - allows you to break up the payload into smaller chunks. We recommend limiting it to 15. The analytics.js library refuses to send a hit if the full payload size is larger than 8192 bytes. This does require quite a lot of data to be stuffed within, but it only takes some dozens of product impressions to clog up the channel
- Product identifier [ SKU / ID ] - you can identify products in GA and GTM either by SKU or by product ID from your Magento catalog
- Enable Brand - if you would like to have each product brand tracked in Google Analytics Ecommerce Reports - select yes and use appropriate brand attribute
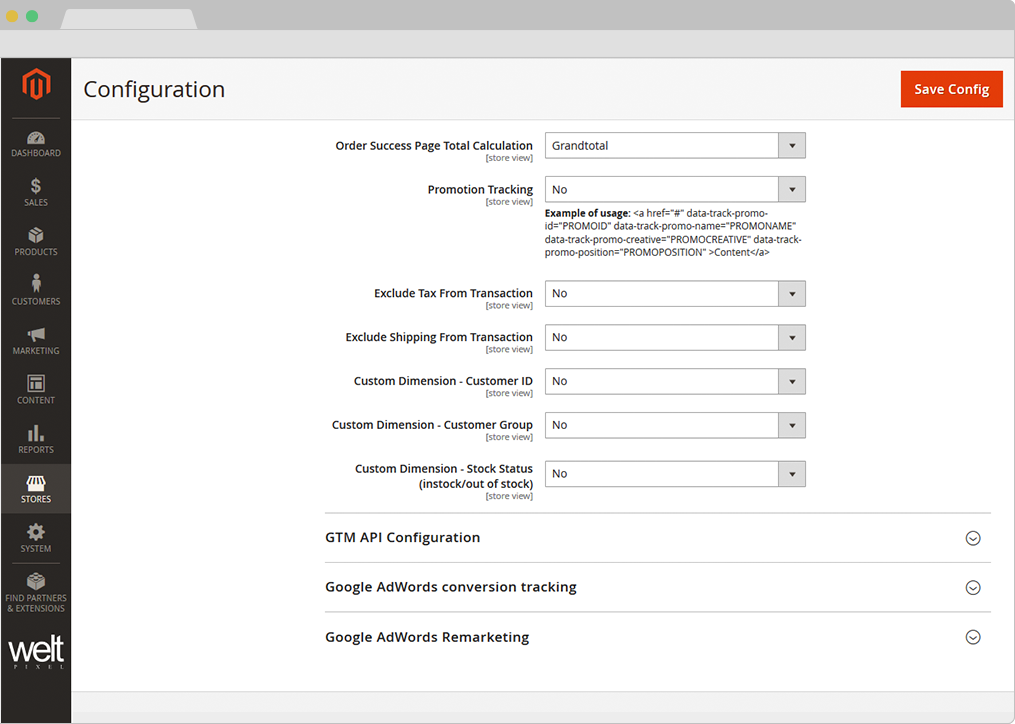
- Order Success Page Total Calculation [ Subtotal / Grandtotal ] - Calculates total amount on success page based on Subtotal or Grandtotal
-
Measure Product Clicks - This option allows ‘Product Click’ tracking on Category Page , Search results page and Related/Cross-sell/Up-sell product grids. If Product Click Tracking is enabled this option rewrites Magento_Catalog::product/list.phtml and Magento_Catalog::product/list/list.phtml. If you are using a custom theme/extension already re-writing this templates check here how you can make the necessary compatibility adjustments:
- Promotion Tracking [ Yes / No ] - Example of usage:
- Exclude Tax From Transaction [ Yes / No ] - Exclude taxes amount from transaction
- Exclude Shipping From Transaction [ Yes / No ] - Exclude shipping amount from transaction
- Custom Dimension - Customer ID [ Yes / No ] - Use customer ID as a custom dimension
- Custom Dimension - Customer Group [ Yes / No ] - Use customer group as a custom dimension
- Custom Dimension - Stock Status (instock/out of stock) [ Yes / No ] - Use customer dimension as a custom dimension
             <a href="#" data-track-promo-id="PROMOID"
                data-track-promo-name="PROMONAME"
                data-track-promo-creative="PROMOCREATIVE"
                data-track-promo-position="PROMOPOSITION">Content
             </a>
- Account ID - Must be set as seen in Step 4 from Configure section
- Container ID - Must be set as seen in Step 4 from Configure section
- Measurement ID - Must be set as seen in Step 4 from Configure section
- I.P Anonymization [ Yes / No ] - Allows website owners to request that all of their users' IP addresses are anonymized. It help website owners comply with their own privacy policies or, in some countries, recommendations from local data protection authorities, which may prevent the storage of full IP address information.
- Enable [ Yes / No ] - Enables Google AdWords conversion tracking
- Google Conversion ID - You need a Google AdWords account adwords.google.com. Follow Google documentation on how to find Google Conversion ID for AdWords.
- Google Conversion Label - Follow Google documentation on how to find Google Conversion Label for AdWords.
- Google Conversion Currency Code - Fill in currency used in AdWords account. e.g. usd

- Enable [ Yes / No ] - Enables Google AdWords remarketing.
- Google Conversion Code - Follow Google documentation on how to find Google Conversion Code for Google AdWords Remarketing.
- Google Conversion Label - Follow Google documentation on how to find Google Conversion Label for Google AdWords Remarketing.

-
Use GTM Preview functionality
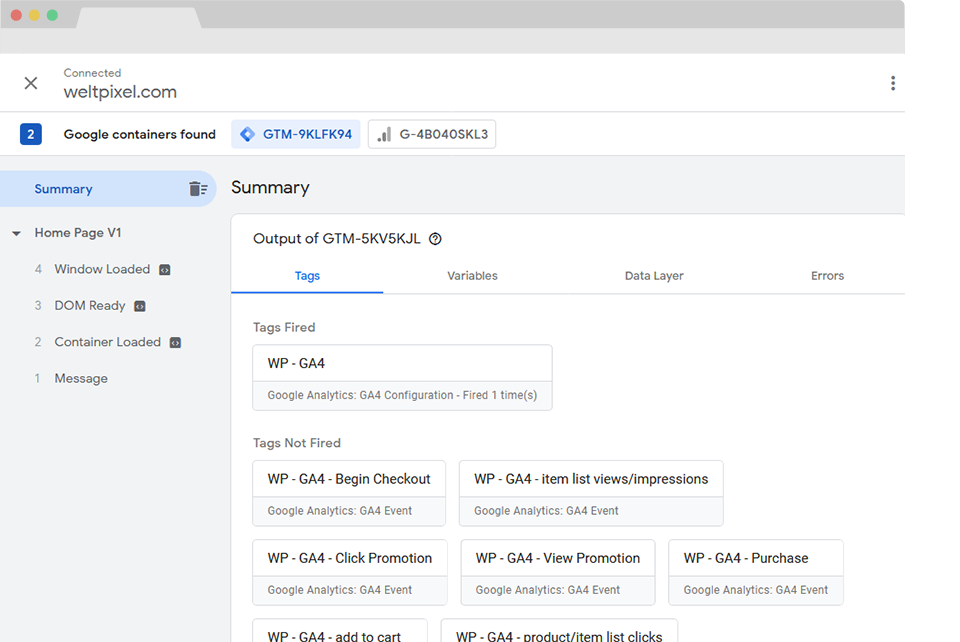
There are many ways to troubleshoot your GTM setup. However we found that using the GTM preview mode you can quickly and easily troubleshoot your GTM setup regardless of your expertise level. Go to your GTM account and in the top right corner you will see the Preview Button
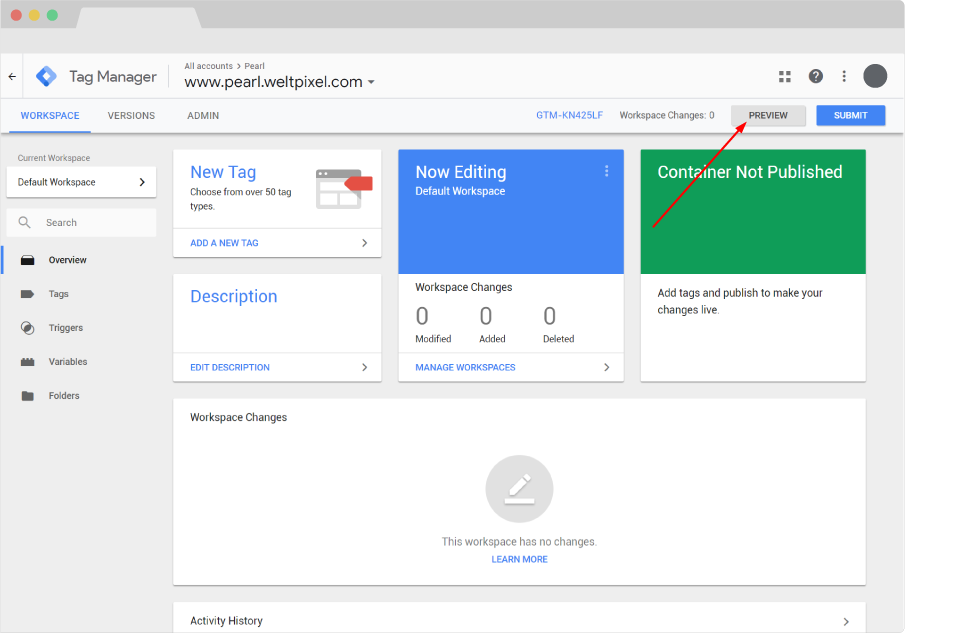
- After hitting the Preview Mode button, you will be redirected to the Tag Assistant page where you'll need to input your website's URL.
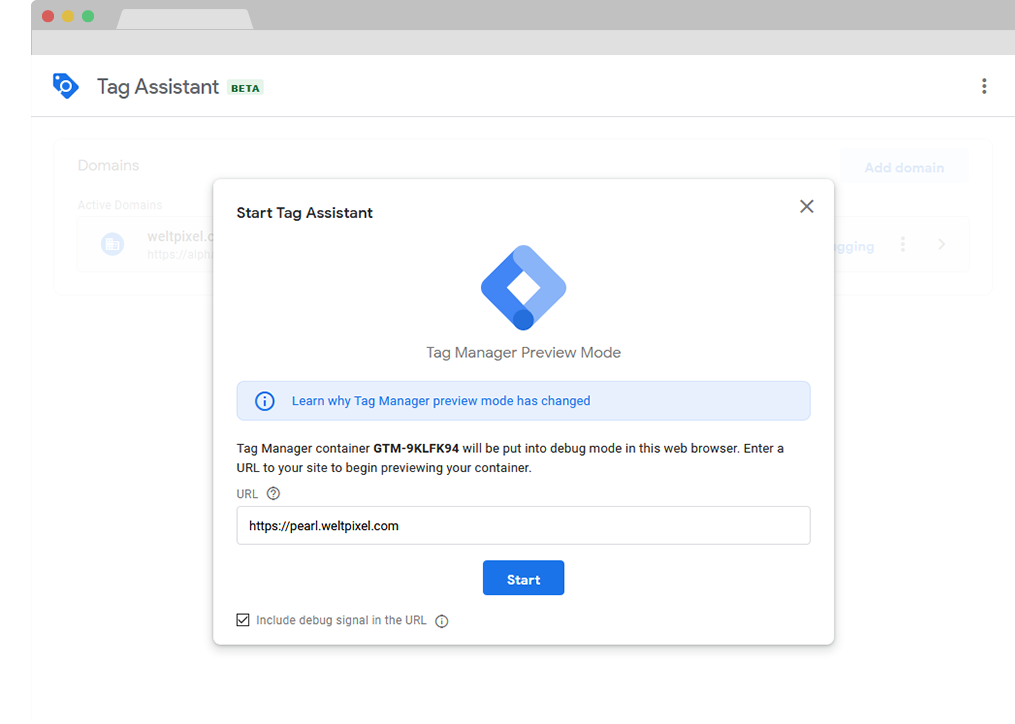
- You will then be redirected to your website in a new tab, with a confirmation that the debugger is connected. Switch back to the Tag Assistant tab and you'll be able to view every tag that gets fired here.