|
Boost online store SEO, improve usability and attract more customers by adding Rich Snippets for Google Search, Facebook Open Graph, Twitter Cards and Pinterest Rich Pins. When you use structured data to mark up content, you help Google better understand its context for display in Search, and you achieve better distribution of your content to users from Search. Rich Snippets enable users to quickly identify specifics about your products and website. Increases real-estate on the Search Result page and increases Click-Thru-Rate (CTR). Google will discover the structured data as soon as it crawls your site (although it may take some time for the Rich Snippets to appear in search results). When Google algorithms discover technically correct markup on a page, Google uses a variety of signals to determine when to show Rich Snippets on the search result page.
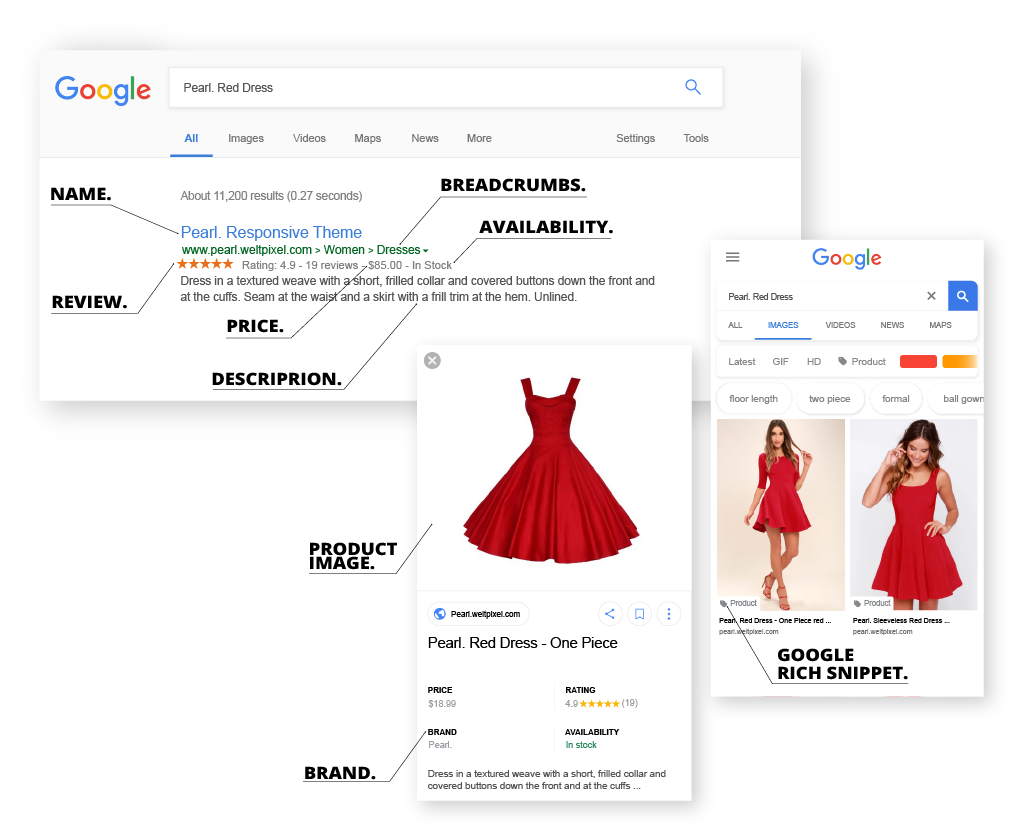
-Agregate rating - show only review score and number. ex 4.8 / 5 from 287 reviews -Agregate rating with Rewiews - add both agregate rating and also latest user rewiews: author, date, message, rating, review name. Specify the number of latest reviews to include. (Pro version)
|
-
Step 1:
Before installing please check the extension compatibility. This extension is currently compatible with the following Magento versions 2.0.X. - 2.4.X. It is recommended to install the extension first on a testing server before you install it on a live (production) server. -
Step 2:
Copy the extension files to below paths of your magento 2 instance. If ‘app/code/WeltPixel’ folder is missing, please create it manually: app/code/WeltPixel/Backend
app/code/WeltPixel/GoogleCards -
Step 3:
Copy the installation GUI folder 'weltpixel-extension-installation' in the root of your Magento installation. In some Magento configurations the public root folder may be under 'pub' directory.
www.yourmagentostore.com/weltpixel-extension-installation/
-
Step 4:
In your browser go to www.yourmagentostore.com/weltpixel-extension-installation/ and simply follow the installation steps from the graphical interface, presented in your browser. -
Step 5:
Wooohooo! The extension is now installed on your Magento store! Congrats!
Troubleshooting
Optional: Copy the extension files into the below path of your Magento 2 instance. If the ‘app/code/WeSupply’ folder
is missing, please create it manually:
app/code/WeSupply/Toolbox
If you experienced any issues or limitations with this quick GUI installation, see also SSH Installation below. SSH installation does the same thing but you are required to issue the commands step by step via CLI. Some servers may have high security configurations and may limit the functionality of this GUI Installer.
-
Step 1:
Before installing Google Rich Snippets, Twitter Cards, Facebook Open Graph & Pinterest Rich Pins Extension on a Magento2 store please check the extension compatibility. This extension is currently compatible with the following Magento versions 2.0.X. - 2.4.x. It is recommended to install the extension first on a testing server before you install it on a live (production) server.
-
Step 2:
Copy the extension files to the paths of your Magento 2 instance listed below. If the ‘app/code/WeltPixel’ folder is missing, please create it manually:
app/code/WeltPixel/Backend
app/code/WeltPixel/GoogleCards -
Step 3:
Access the root of your Magento 2 project from the command line and run the following commands:
php bin/magento module:enable WeltPixel_Backend --clear-static-content
php bin/magento module:enable WeltPixel_GoogleCards --clear-static-content
php bin/magento setup:upgrade
-
Step 4:
Flush any cache that you might still have enabled on your server or in Magento.
-
Step 5:
Woohoo, the extension is installed!
Optional:
Copy the extension files into the below path of your Magento 2 instance. If the ‘app/code/WeSupply’ folder
is missing, please create it manually:
app/code/WeSupply/Toolbox
- Step 1. Remove extension code under app/code/WeltPixel/GoogleCards before adding the new extension files. The extension may be refactored and old unused files may cause random issues so it's best to only keep the latest version of the files.
- Step 2. Step 2. Follow normal installation instructions above.
- If the extension was purchased from the Magento Marketplace, follow the instructions in this article: How to install extension if purchased from the Magento Marketplace
- If asked for a license, follow the steps presented in section 7 of this article: License key for local / staging / development environment. Multi-store licensing.
For more settings on attribute level, go to Admin > Stores > Attributes > Product > [select attribute] > Storefront Properties > WeltPixel Layered Navigation Properties tab
- Filter Display Options [Closed / Fully Opened / Exapandable] - Select how the attribute options are displayed. Can be used only with catalog input type Dropdown, Attribute Multi Select and Price.
- Initial Number of Visible Options - The number of attribute option(s) that will be initially visible. Can be used only with Filter Display Options - Expandable.
- Expandable items behaviour [All / Show x more] - Select the number of attribute option(s) to show/hide when using Expand feature. Can be used only with Filter Display Options - Expandable.
- Enable Attribute Multi Select [Yes / No] - Allow to filter multiple options from the same attribute.
- Show Item Counter [Yes / No] - Show item counter next to the current attribute options.
- Sort By [Position / Name] - Select the sorting of the current attribute options.
- Enable options filter on Desktop [Yes / No] - Enable search functionality for attribute options on Desktop.
- Enable options filter on Mobile [Yes / No] - Enable search functionality for attribute options on Mobile.
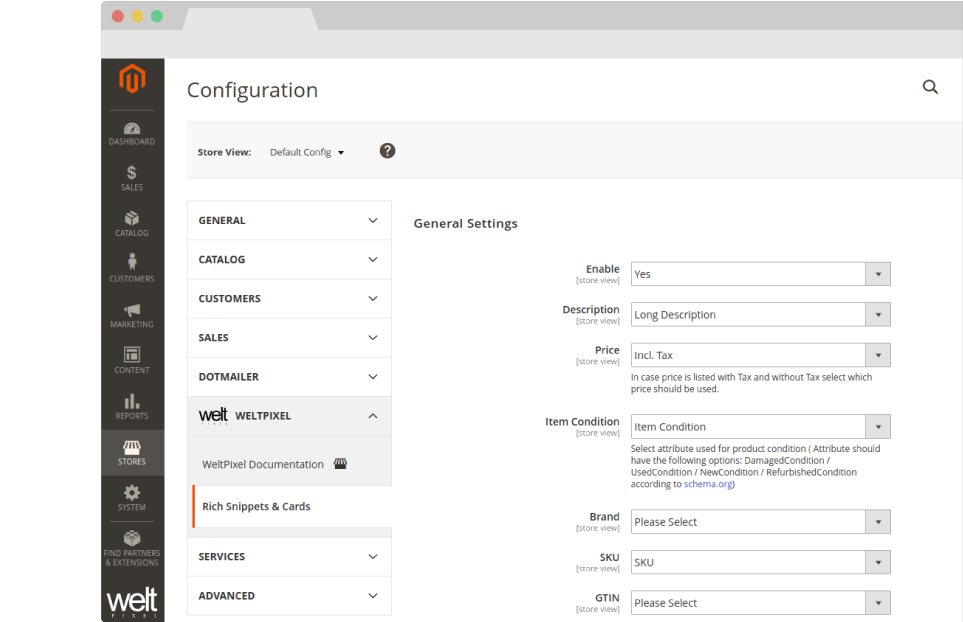
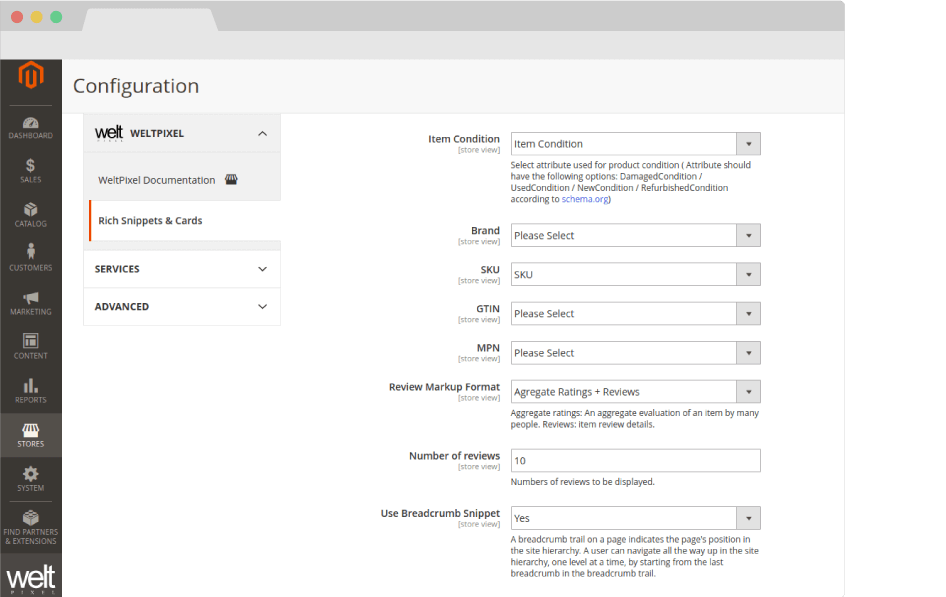
- Brand - Select an additional brand that will be added to structured data (Country of manufacture, Shipping, etc..).
- SKU - Control over the attribute that is used for product SKU, usually it is used the magento default attribute SKU but in special cases a different attribute can be used.
- GTIN - Control over the attribute that is used for product GTIN code. A 13 digit code is necessary to be added on product details for this partiular attibute in order to be correctly validated. If you do not use a GTIM code, do not select any attribute for this option and it will not show up in your structured data.
- MPN - Control over the attribute that is used for product MPN code. This code is necessary to be added on product details in order to show up in structured data. If you do not use a MPN code, do not select any attribute for this option and it will not show up in your structured data.
- Review Markup Format - select between Agregate Ratings and Agregate Ratings with Detailed Reviews
- Number of reviews - Specify the number of latest reviews to included in structured data.
- Use Breadcrumb Snippet - Add data related to Breadcrumbs to structured data. A breadcrumb trail on a page indicates the page's position in the site hierarchy. A user can navigate all the way up in the site hierarchy, one level at a time, by starting from the last breadcrumb in the breadcrumb trail.
-Agregate rating - show only review score and number. ex 4.8 / 5 from 287 reviews
-Agregate rating with Rewiews - add both agregate rating and also latest user rewiews: author, date, message, rating, review name. Ability to specify the number of latest reviews to include. (Pro version)
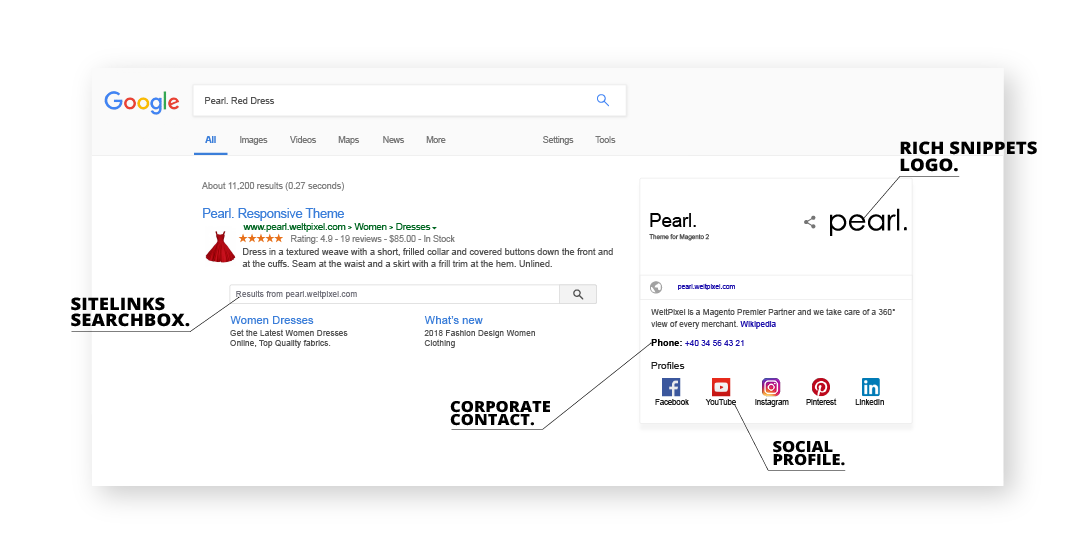
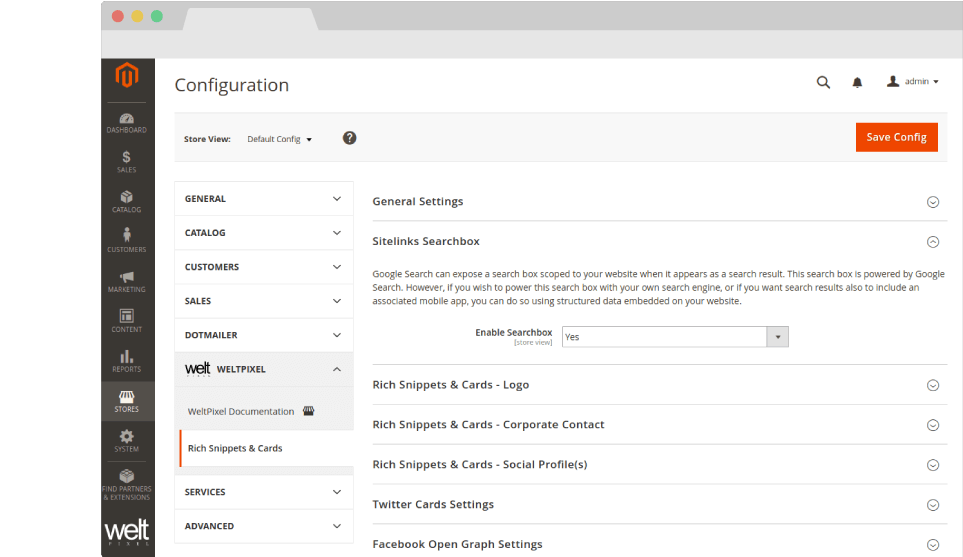
Google Search can expose a search box scoped to your website when it appears as a search result. This search box is powered by Google Search. However, if you wish to power this search box with your own search engine, or if you want search results also to include an associated mobile app, you can do so using structured data embedded on your website.
Go to Admin > WeltPixel > Rich Snippets & Cards > Sitelinks Searchbox:
- Enable Searchbox [ Yes / No ] - Activate searchbox functionality in Google Search.
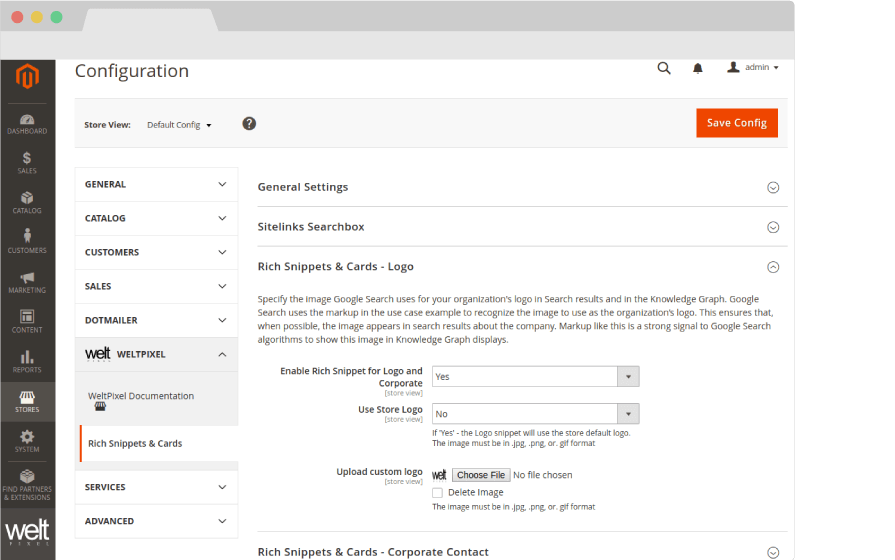
Specify the image Google Search uses for your organization's logo in Search results and in the Knowledge Graph. Google Search uses the markup in the use case example to recognize the image to use as the organization’s logo. This ensures that, when possible, the image appears in search results about the company. Markup like this is a strong signal to Google Search algorithms to show this image in Knowledge Graph displays.
Go to Admin > WeltPixel > Rich Snippets & Cards > Rich Snippets & Cards Logo:
- Enable Rich Snippet for Logo and Corporate [ Yes / No ] - Enable Google Search to show logo in Search results and in the Knowledge Graph.
-Use Store Logo - the Logo snippet will use the store default logo. The image must be in .jpg, .png, or. gif format
-Upload Custom Logo - you can upload a custom logo, different than the logo used for your store. The image must be in .jpg, .png, or. gif format
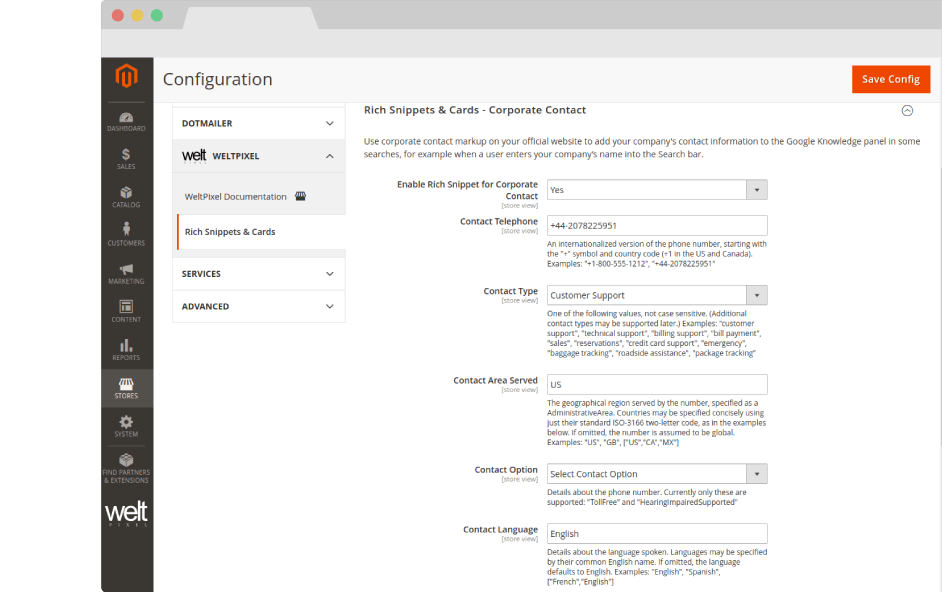
Go to Admin > WeltPixel > Rich Snippets & Cards > Rich Snippets & Cards - Corporate Contact:
- Enable Rich Snippet for Corporate Contact [ Yes / No ] - Enable Google Search to show Corporate contact in Search results and in the Knowledge Graph.
- Contact Telephone An internationalized version of the phone number, starting with the "+" symbol and country code (+1 in the US and Canada). Examples: "+1-800-555-1212", "+44-2078225951"
- Contact Type - Examples: "customer support", "technical support", "billing support", "bill payment", "sales", "reservations", "credit card support", "emergency", "baggage tracking", "roadside assistance", "package tracking"
- Contact Area Served - The geographical region served by the number, specified as a AdministrativeArea. Countries may be specified concisely using just their standard ISO-3166 two-letter code, as in the examples below. If omitted, the number is assumed to be global. Examples: "US", "GB", ["US","CA","MX"]
- Contact Option - Details about the phone number. Currently only these are supported: "TollFree" and "HearingImpairedSupported"
- Contact Language - Details about the language spoken. Languages may be specified by their common English name. If omitted, the language defaults to English. Examples: "English", "Spanish", ["French","English"]
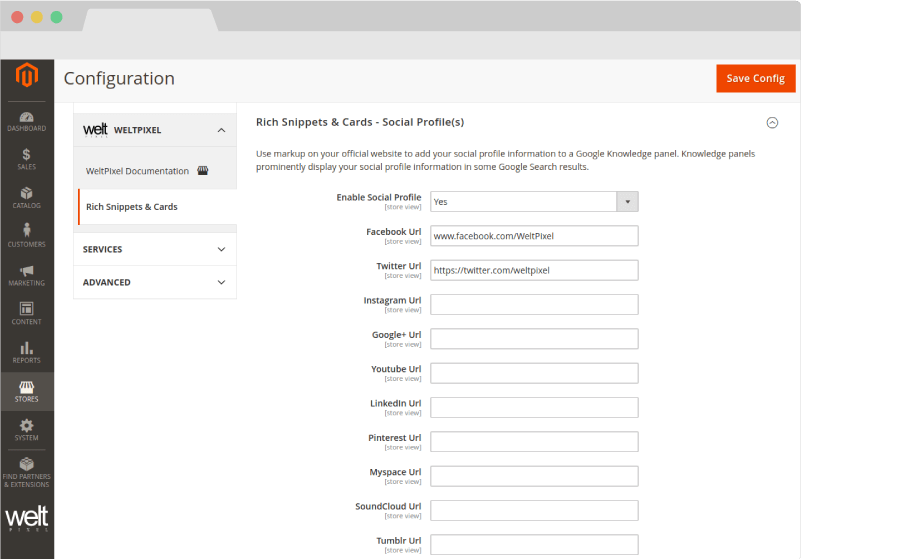
Use markup on your official website to add your social profile information to a Google Knowledge panel. Knowledge panels prominently display your social profile information in some Google Search results.
Enable Social Profile - Enable Google Search to show up to 10 Social Profiles in Search results and in the Knowledge Graph.
Facebook Url - If added, Facebook profile will show in Search results and Knowledge Graph.
Twitter Url - If added, Twitter profile will show in Search results and Knowledge Graph.
Instagram Url - If added, Instagram profile will show in Search results and Knowledge Graph.
Google+ Url - If added, Google+ profile will show in Search results and Knowledge Graph.
Youtube Url - If added, Youtube profile will show in Search results and Knowledge Graph.
Linkedin Url - If added, Linkedin profile will show in Search results and Knowledge Graph.
Pinterest Url - If added, Pinterest profile will show in Search results and Knowledge Graph.
Myspace Url - If added, Myspace profile will show in Search results and Knowledge Graph.
SoundCloud Url - If added, SoundCloud profile will show in Search results and Knowledge Graph.
Tumblr Url - If added, Tumblr profile will show in Search results and Knowledge Graph.
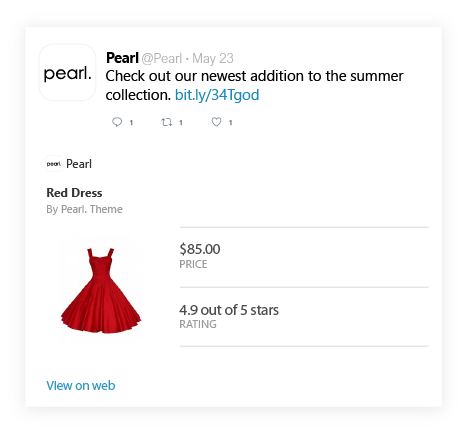
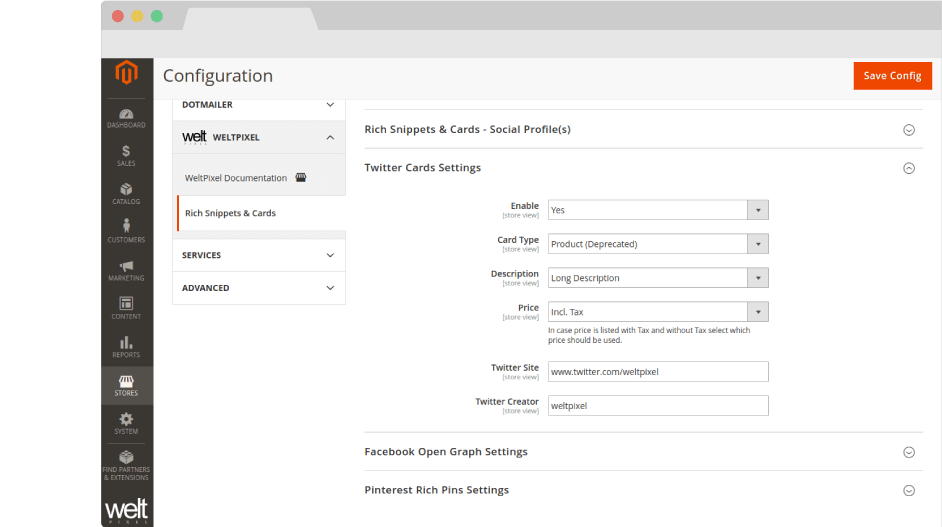
- Go to Admin > WeltPixel > Rich Snippets & Cards > Twitter Cards Settings and set the Twitter Cards:
-Enable [ Yes / No ]: Activate or deactivate the Twitter Cards feature
-Description: Choose between short description and long description
-Twitter Site: Type your store Twitter username. For example @site_username
-Twitter Creator: Type Twitter username of the administrator of Magento store or owner of the store. You can use the site username or leave empty.
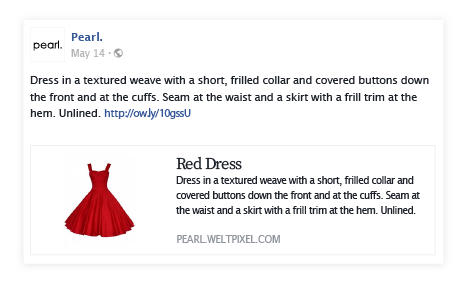
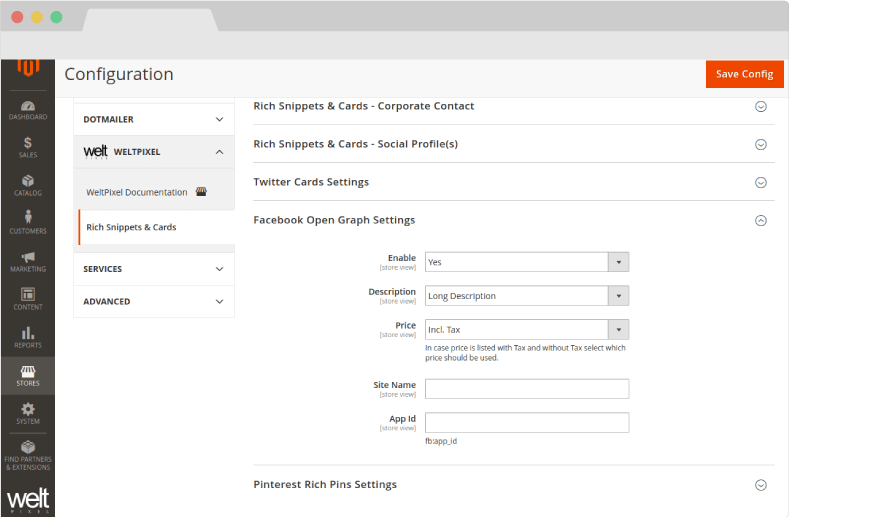
- Go to Admin > WeltPixel > Rich Snippets & Cards > Facebook Open Graph Settings and set the Facebook Open Graph:
-Enable [ Yes / No ]: Activate or deactivate the Facebook Open Graph feature
-Description: Choose between short description and long description
-Site Name: Insert Website’s name
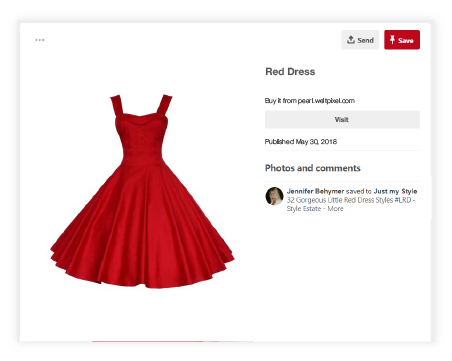
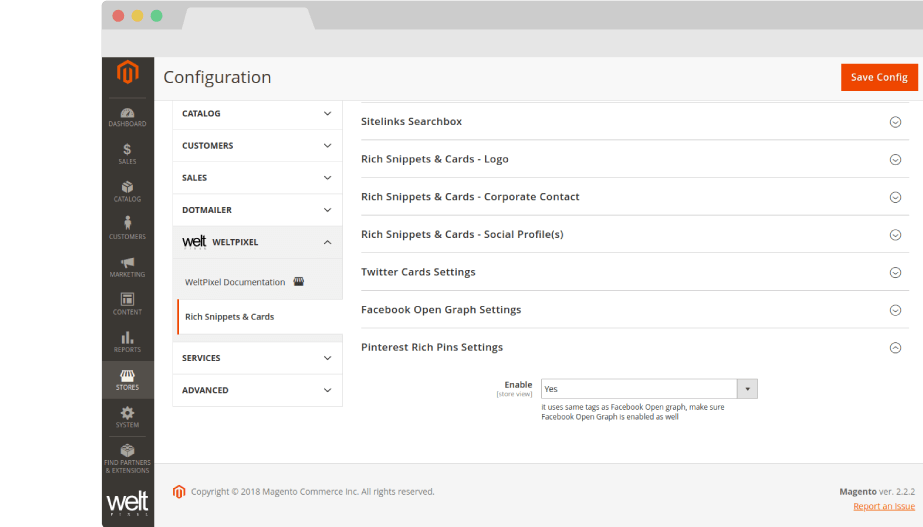
- Go to Admin > WeltPixel > Rich Snippets & Cards > Pinterest Rich Pins Settings and set the Pinterest Rich Pins:
-Enable [ Yes / No ]: Activate or deactivate the Pinterest Rich Pins feature
-
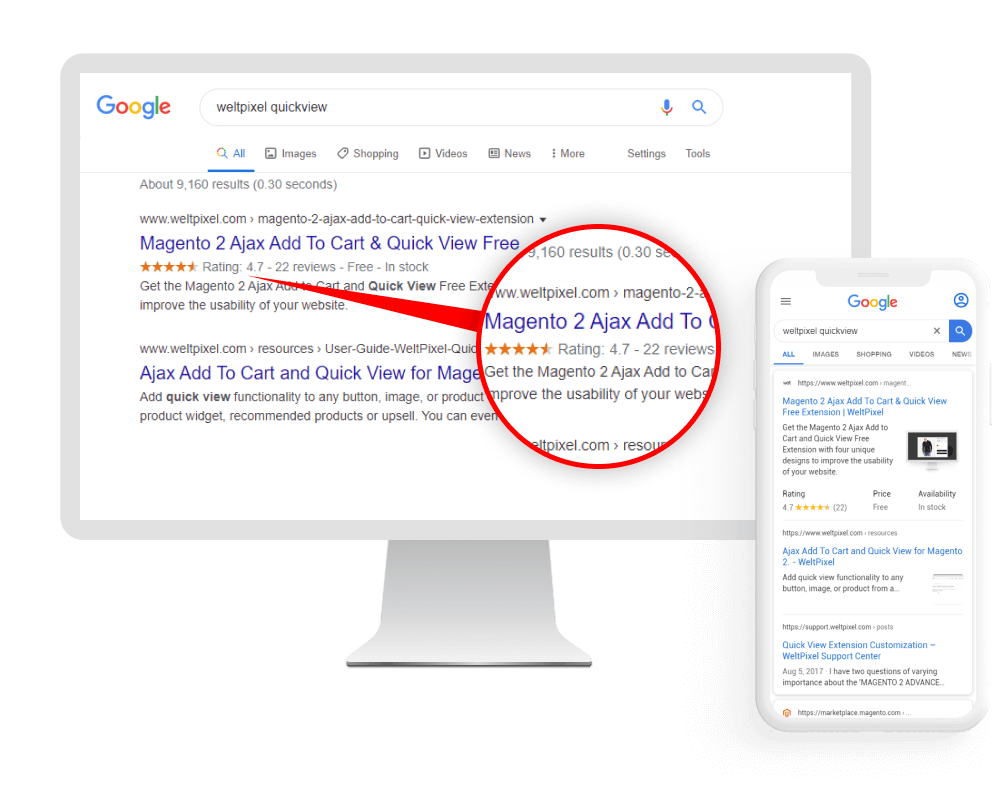
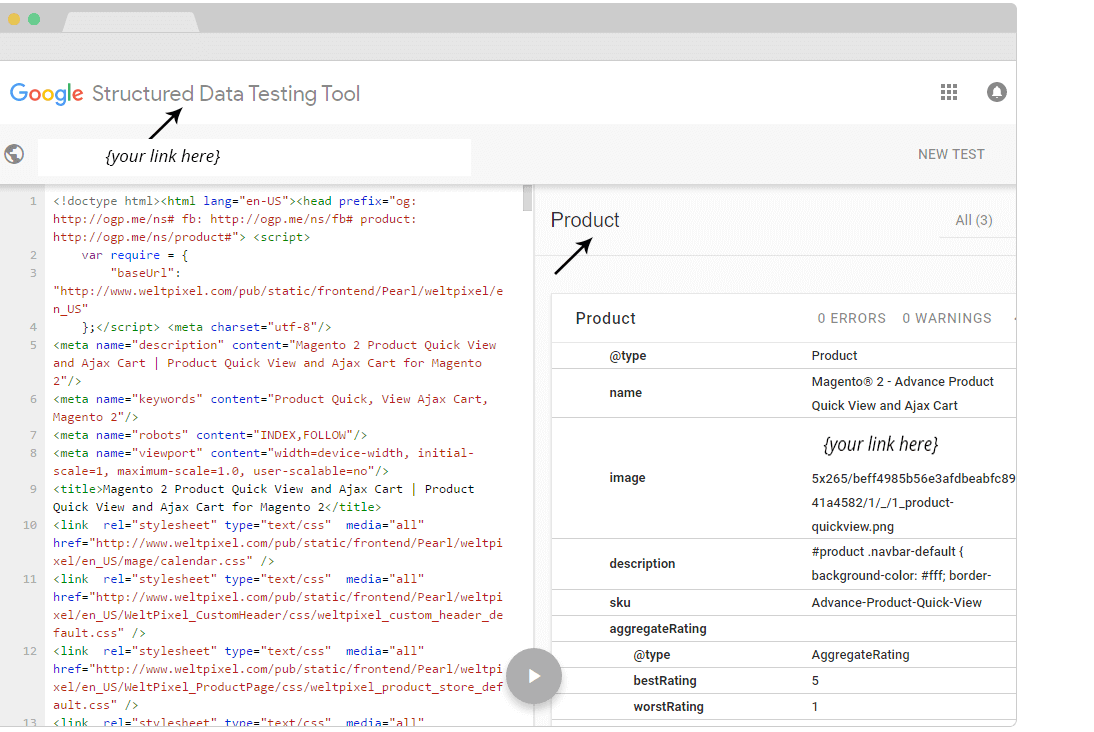
You can test the Google Cards & Rich Cards functionality by using this testing tool from Google, just place a link from one of your products and you will see data is structured as Google expects: Google Structured Data Testing Tool
Note: Do not forget to login to Google account for the Google Structured Data Testing Tool to work Based on Google policy this data will be shown in the search results. Stores using this data structure will be highly advantaged by search engines, like Google, Yahoo, Bing and other search engines.
-
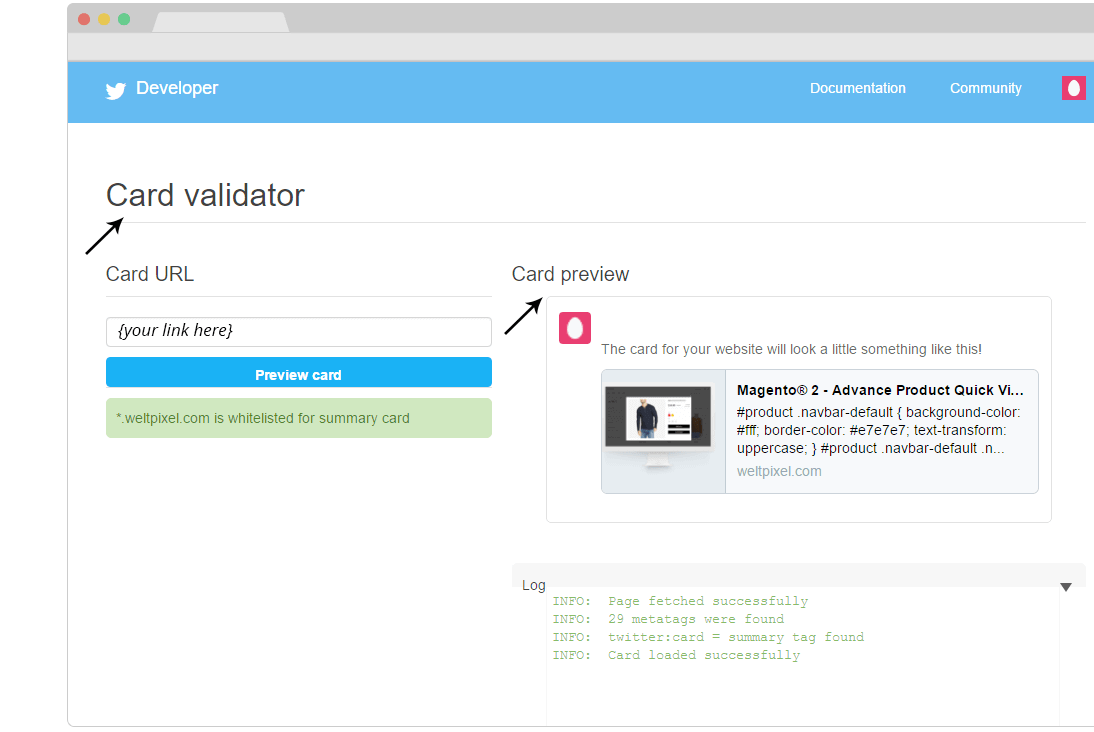
You can test the Twitter Cards functionality by using this testing tool from Twitter, just place a link from one of your products and you will see data is structured as Twitter expects: Twitter Cards Tool
Note: Do not forget to login to Twitter account for the Twitter Cards Tool to work
-
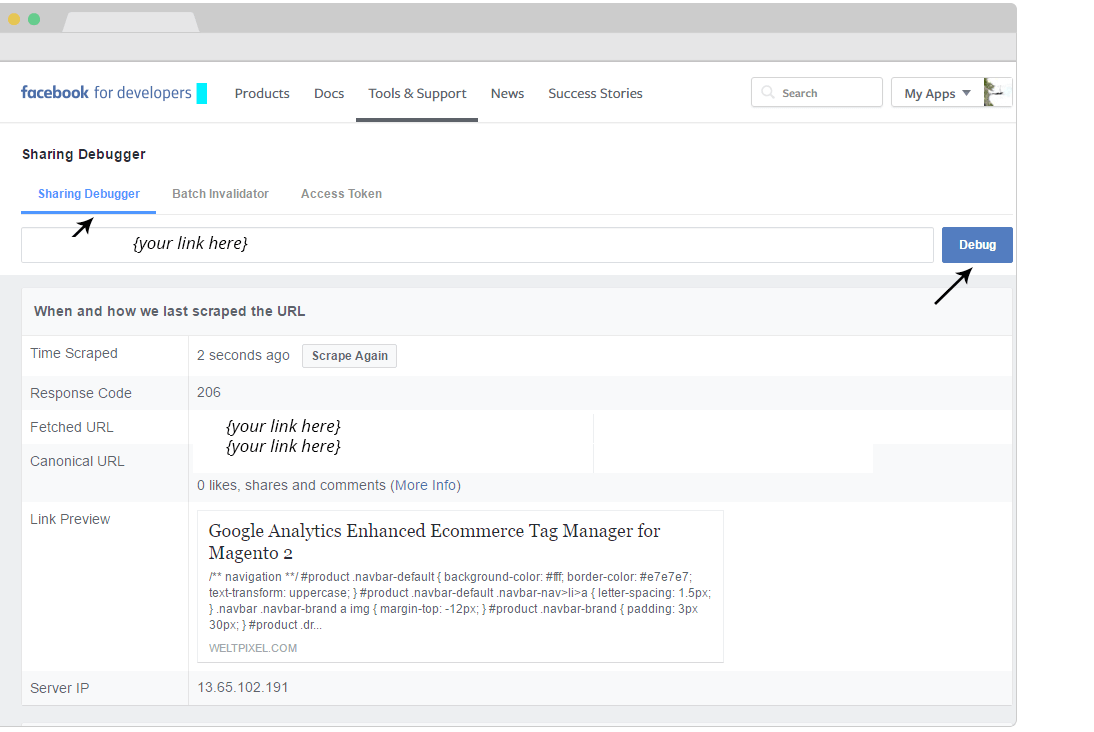
You can test the Facebook Open Graph functionality by using this testing tool from Facebook, just place a link from one of your products and you will see data is structured as Facebook expects: Facebook Developpers Tool
Note: Do not forget to login to Facebook Open Graph for the Facebook Developpers Tool to work Based on Google policy this data will be shown in the search results. Stores using this data structure will be highly advantaged by search engines, like Google, Yahoo, Bing and other search engines.
-
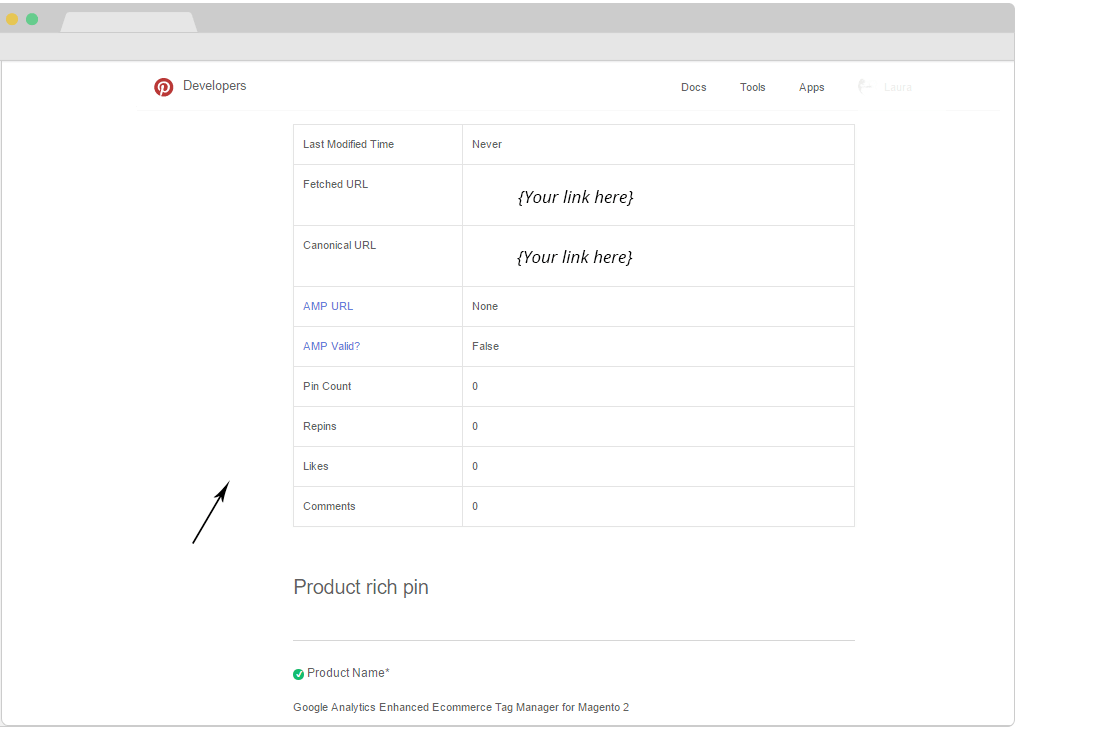
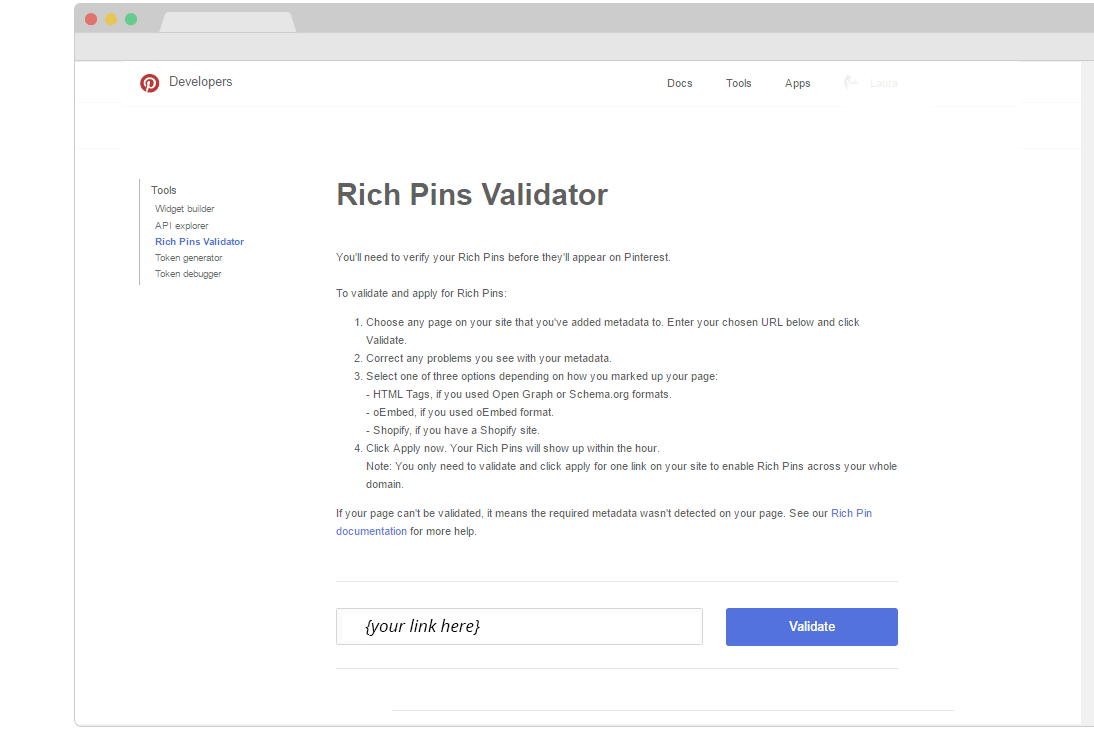
You can test the Pinterest functionality by using this testing tool from Pinterest, just place a link from one of your products and you will see data is structured as Pinterest expects: Pinterest Rich Pins Tool
Note: Do not forget to login to Pinterest for the Pinterest Rich Pins Tool to work
- After you click debug button, then you will get the analysis.