Visual, production-ready AI workflows — portable as JSON


Features · Quick Start · Usage · Development · Support
Click to watch the demo video
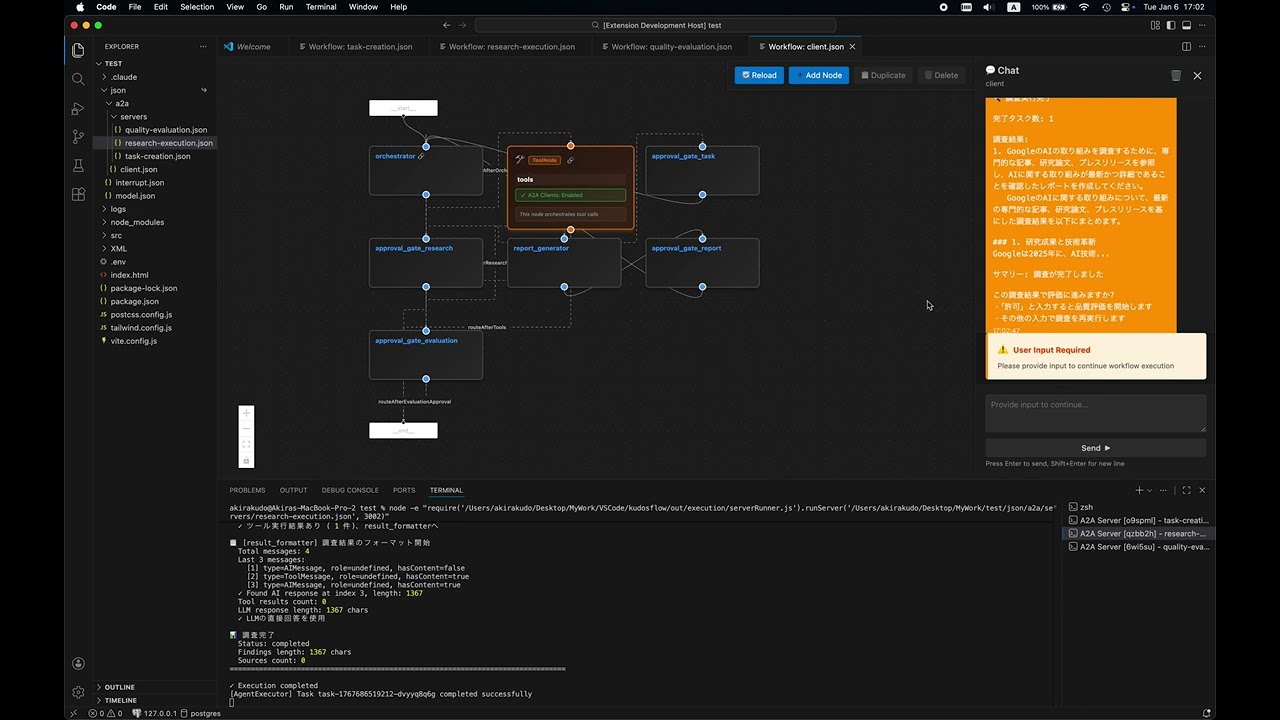
Build and execute node-based AI agent workflows with a drag-and-drop interface inside VSCode. Design once, run anywhere—your workflows are portable JSON files that can be version-controlled, shared, and executed in production.
- Visual First: See your entire AI workflow at a glance—no more scattered scripts
- Production Ready: From prototype to production with the same JSON workflow
- Portable: Version control your AI logic as standard JSON files
- Integrated: Works inside VSCode with A2A and MCP protocol support
- 🎨 Visual Workflow Editor: Drag-and-drop interface powered by React Flow
- 🔌 Node-Based Architecture: Connect nodes to build complex AI agent workflows
- 💾 JSON Storage: Workflows stored as portable JSON files in your workspace
- 🔄 A2A & MCP Integration: Support for Agent-to-Agent and MCP communication protocols
- 🎯 Context Menu Integration: Right-click any JSON file to open in workflow editor
- 🚀 Live Execution: Real-time workflow execution and testing
- 🧵 State Management: Thread-based conversation persistence across requests
- VSCode 1.96.0 or higher
- API keys for your AI providers (OpenAI, Anthropic, or Ollama)
code --install-extension kudosflow2-1.0.0.vsixSearch for "Kudosflow2" in the VSCode extensions marketplace.
-
Configure API Keys
Create a
.envfile in your project root:# OpenAI (optional) OPENAI_API_KEY=your_openai_api_key_here # Anthropic (optional) ANTHROPIC_API_KEY=your_anthropic_api_key_here # Ollama (optional, local) OLLAMA_BASE_URL=http://127.0.0.1:11434
-
Explore Sample Workflows
Sample workflows are automatically installed to:
~/.vscode/extensions/akirakudo911.kudosflow2-1.0.0/json/Basic Examples:
interrupt.json- Interactive workflow with user interruptsmodel.json- Career counselor with OpenAI integration
A2A Examples:
a2a/client.json- A2A client workflowa2a/servers/task-creation.json- Task creation servera2a/servers/research-execution.json- Research execution servera2a/servers/quality-evaluation.json- Quality evaluation server
Three ways to open:
- From Explorer: Right-click any
.jsonfile → "Open Workflow Editor" - Command Palette:
Ctrl+Shift+P(orCmd+Shift+P) → "Kudosflow: Open Workflow Editor" - Create New: Right-click a folder → "Create New Workflow Here"
- Click the + button to add nodes to the canvas
- Drag nodes to position them on the canvas
- Connect nodes by dragging from output anchors (right) to input anchors (left)
- Configure each node by clicking it and editing parameters
- Save your workflow using the Save button in the toolbar
- Execute your workflow using the Run button
Task Creation → Approval → Research Execution → Approval
  → Report Generation → Report Approval → Quality Evaluation → Complete
Each step can be an independent agent workflow, communicating via A2A protocol.
Kudosflow supports stateful conversations using thread IDs:
- thread_id: Optional parameter for maintaining conversation state
- State Persistence: Same thread_id retrieves previous context
- Fresh Start: Omit thread_id to start a new conversation
# Start new conversation (no thread_id)
curl -X POST http://localhost:3000/message/send \
  -H "Content-Type: application/json" \
  -d '{
    "message": {"parts": [{"type": "text", "text": "Research the AI market"}]}
  }'
# Response includes: thread_id: "thread-1234567890-abc123"

# Continue conversation (with thread_id)
curl -X POST http://localhost:3000/message/send \
  -H "Content-Type: application/json" \
  -d '{
    "message": {"parts": [{"type": "text", "text": "Approved"}]},
    "thread_id": "thread-1234567890-abc123"
  }'
# State is preserved, context maintained- Node.js 20.x or higher
- Yarn package manager (not npm)
- VSCode 1.96.0 or higher
# Install all dependencies (extension + webview)
yarn install:all

# Copy environment example
cp .env.example .env
# Edit .env with your API keys# Compile TypeScript for extension
yarn compile
# Watch mode for extension development
yarn watch
# Start webview development server with hot reload
yarn start:webview
# Build webview for production
yarn build:webview
# Package extension
yarn package
# Run linter
yarn lint
# Run tests
yarn pretest- Press
F5in VSCode to launch the Extension Development Host - Make changes to extension code →
yarn compile→ Reload window (Ctrl+R) - For webview changes, run
yarn start:webviewfor hot reload
The extension uses a two-part architecture:
1. Extension Side (Node.js context)
- Entry: src/extension.ts
- Build: TypeScript →
out/directory - Manages VSCode extension lifecycle and webview panel
2. Webview Side (Browser context)
- Entry: webview-ui/src/index.tsx
- Build: Vite + React →
webview-ui/build/directory - Contains the React Flow canvas UI
Communication between extension and webview uses message passing via postMessage API.
- OpenAgentJson - JSON schema definitions for agent workflows
- a2a-server - Agent-to-Agent communication server
- SceneGraphManager - Scene graph management library (Private repository)
Contributions are welcome! Please feel free to submit a Pull Request.
MIT License - see LICENSE for details.
Hand-crafted by Akira Kudo in Tokyo, Japan
Copyright © 2023-present Akira Kudo