


x2webrtc is a command-line tool for forwarding an X window as a media track through WebRTC. It is a simple tool; it just grabs screenshots for the window with Xlib and send them via a WebRTC stream, but it can realize the following features:
- You can send an X window through the NAT.
- A media stream is transported using a secure method. (compared to the standard VNC)
- You can easily install it by pip.
- You don't necessarily have admin access to the system.
Note that Python 3.6+ and X Window System are required to use the tool.
pip install x2webrtcThe tool requires aiortc to work with WebRTC.
Please refer to the install instruction of aiortc if you failed to install it automatically.
NOTE: Currently, hand signaling is required to start a WebRTC session. I am planning to implement a plug-in system so that a user can customize its signaling method.
-
Start x2webrtc.
x2webrtc forward
If
DISPLAYenvironment is not set to your environment, pass--displayargument to specify an X server.x2webrtc forward --display :0
-
(tentative) Copy a WebRTC offer. You will see the following message on your terminal:
-- Please send this message to the remote party --
{"sdp": "..." , "type": "offer"}
Please copy the offer json.
-
(tentative) Open the web viewer and click
Connectbutton. -
(tentative) Paste the offer json into
Input Offertext-area (A) and clickCreate Answerbutton (B). Then you will get an answer json (C). Copy the json again.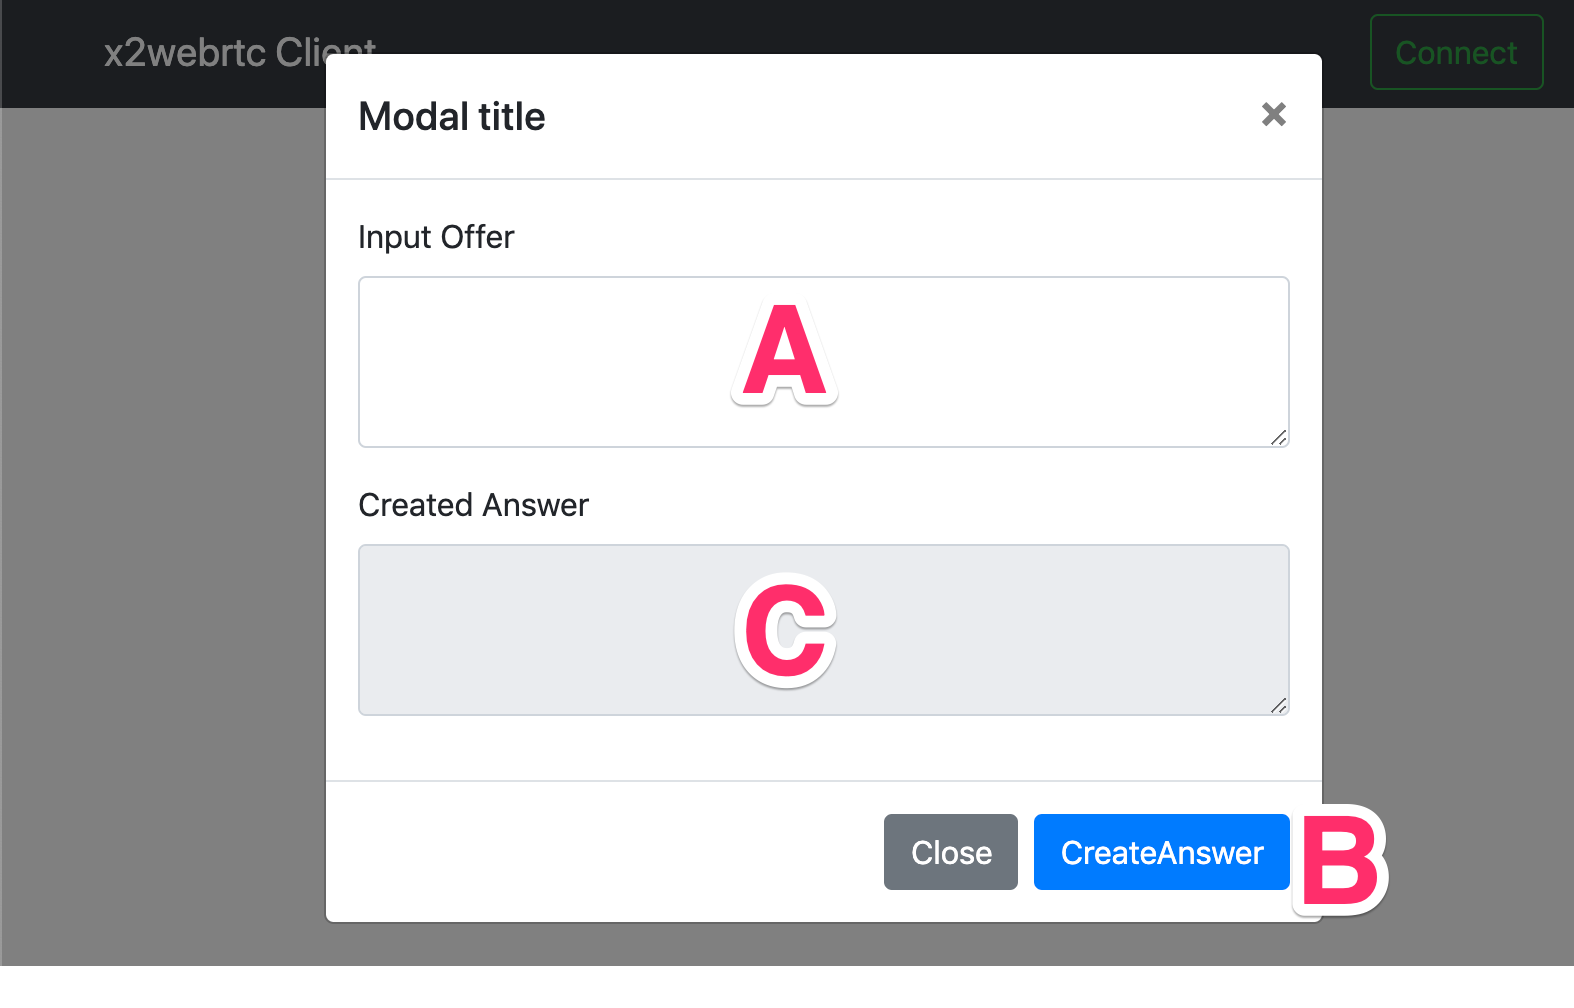
-
(tentative) Go back to your terminal. Paste the answer json into the terminal, then press Enter.
-
Now you will see your screen in the web viewer.
usage: x2webrtc [-h] [-v] COMMANDS ...

Commands:
    forward       forward X Window
    info          show window information of the X server

optional arguments:
  -h, --help      show this help message and exit
-v, --verbose verbose; can be used up to 3 times to increase verbosityForward a specified X window.
usage: x2webrtc forward [-h] [--display DISPLAY]

optional arguments:
  -h, --help         show this help message and exit
--display DISPLAY display_name of the X server to connect to (e.g., hostname:1, :1.)Show information on a specified X server.
usage: x2webrtc info [-h] [--display DISPLAY] [--props]

optional arguments:
  -h, --help         show this help message and exit
  --display DISPLAY  display_name of the X server to connect to (e.g., hostname:1, :1.)
--props show all properties of each windowThe order of preference is the $X2WEBRTC_CONFIG environment variable, then .x2webrtc file of the working directory, and then ~/.x2webrtc.
The config file must be in the YAML format.
Here is an example of a configuration file:
signaling_plugin: "path/to/signaling_plugin.py"  # optional
peer_connection:                 # optional
  ice_servers:
    - url: stun:stun.example.com
    - url: turn:turn.example.com
      username: shamiko          # optional
      credential: momo           # optional
For more details, please refer to x2webrtc/config.py.
You can customize the signaling method that x2webrtc uses for a WebRTC peer connection by using a plugin. Here is an example of a plugin implementation:
from typing import Type
from aiortc import RTCPeerConnection
from x2webrtc.plugin import SignalingPlugin

class SomePlugin(SignalingPlugin):
    async def __call__(self, pc: RTCPeerConnection) -> bool:
        return True

def plugin() -> Type[SignalingPlugin]:
    return SomePlugin
A plugin file must have a plugin function that returns a subclass of SignalingPlugin.
The plugin file is required to specify in a configuration file, as already mentioned in the Configuration section.
For more details, please refer to CopyAndPasteSignaling class located in x2webrtc/signaling.py.
PyAV uses AV_CODEC_CAP_HARDWARE macro in its source code, but it seems to be available in libavcodec >= 58.0. Check the version of libavcodec and try again.