
A set of classes that can create a word cloud image in the Scriptable iOS app. Basic Usage:
const wordCloudWords = [new WordCloudWord({word, weight}), ...]
const wordCloud = new WordCloud({width, height, wordCloudWords});
const image = await wordCloud.getImage();
There are three word cloud scripts provided in this repo:
| Script | Description |
|---|---|
| word-cloud.js | The full word cloud script that shows how everything works. |
| minified-word-cloud.js | A minified version of the word cloud script that is significantly easier to build with. |
| word-cloud-demo.js | An interactive demo that includes copy-pastable Scriptable scripts. |
I recommend starting with the demo script or minified script. I only recommend using the full word-cloud.js script if you are experienced and are trying to modify how the word cloud itself works.
There are only three required fields: Width, Height, and WordCloudWords. WordCloudWords are objects with two properties: Word (string) and Weight (number). Here's an example of a WordCloudWords array:
const wordCloudWords = [
  new WordCloudWord({ word: "Seattle", weight: 10 }),
  new WordCloudWord({ word: "Boston", weight: 10 }),
  new WordCloudWord({ word: "Chicago", weight: 8 }),
  new WordCloudWord({ word: "Denver", weight: 7 }),
  new WordCloudWord({ word: "Boise", weight: 7 }),
  new WordCloudWord({ word: "Los Angeles", weight: 7 }),
  new WordCloudWord({ word: "San Fransisco", weight: 6 }),
  new WordCloudWord({ word: "Victoria", weight: 6 }),
  new WordCloudWord({ word: "Portland", weight: 5 }),
  new WordCloudWord({ word: "London", weight: 5 }),
  new WordCloudWord({ word: "Dublin", weight: 3 }),
  new WordCloudWord({ word: "Barcelona", weight: 3 }),
  new WordCloudWord({ word: "Amsterdam", weight: 3 }),
  new WordCloudWord({ word: "Budapest", weight: 3 }),
  new WordCloudWord({ word: "Venice", weight: 3 }),
  new WordCloudWord({ word: "Florence", weight: 2 }),
  new WordCloudWord({ word: "Oslo", weight: 2 }),
  new WordCloudWord({ word: "Paris", weight: 2 }),
  new WordCloudWord({ word: "Tokyo", weight: 1 }),
  new WordCloudWord({ word: "New York", weight: 1 }),
  new WordCloudWord({ word: "Fort", weight: 1 })
];
This object could be static or you could code something to generate it. I recommend calculating a word's weight by it's frequency in a dataset (Calendar events, weather, etc.), but you could use whatever you want!
Next is Width and Height. These are pretty simple to work with. Here are some examples:
| Dark Mode | Light Mode | Simplified Input |
|---|---|---|
 |
 |
{ width: 250, height: 250 } |
 |
 |
{ width: 530, height: 250 } |
The word cloud is generated dynamically so it can fit different widget sizes. It will also work with weirder sizes like long ones. Get creative!
| Dark Mode | Light Mode | Simplified Input |
|---|---|---|
 |
 |
{ width: 200, height: 600 } |
The next sections will use the sample WordCloudWords object and a Width and Height of 250 each. Have fun!
Now we get to the fun stuff. Here are some flags that you can pass in to modify the word cloud's behavior. When debug is set to true it will display the 'hitboxes' used in the placement algorithm for each word. it will also display the placement algorithm's path:
| Dark Mode | Light Mode | Simplified Input |
|---|---|---|
 |
 |
{ debug: true } |
The growToFit flag determines whether or not the canvas will 'grow' to fit all of the words provided. When set to true (default) it will continuously increase the size of the canvas until all of the provided words can be placed. If it is set to false it will simply try to place words as best it can:
| Dark Mode | Light Mode | Simplified Input |
|---|---|---|
 |
 |
{ growToFit: false } |
The respectScreenScale flag is passed to the DrawContext. If you are running into performance issues (for example, the script does not display on the homescreen) please try setting this to false. Until a performance update is made to the script you can also try removing words until it displays.
| Dark Mode | Light Mode | Simplified Input |
|---|---|---|
 |
 |
{ respectScreenScale: false } |
Placement functions are plotting functions that return (x,y) coordinates. They are called continuously until all of the words can be plotted with their center on a coordinate (or there is no more space if growToFit is false). They can be confusing at first but they are very powerful. Before we get into it, here's an example:
  function spiralPlacementFunction(width, height, centerX, centerY, xRatio, yRatio, previousResult) {
    let radius, angle;

    if (previousResult) {
      ({ radius, angle } = previousResult);
      radius += .75;
      angle += (Math.PI * 2) / 50;
    } else {
      radius = 0;
      angle = 0;
    }

    const x = centerX + radius * Math.cos(angle) * xRatio;
    const y = centerY + radius * Math.sin(angle) * yRatio;
    return { x, y, radius, angle }
  }
The inputs width, height, centerX, and centerY are pretty straightforward. xRatio and yRatio are the ratio of the side compared to the largest side and can be useful when scaling the algorithm for different input parameters. PreviousResult contains the results from the last iteration of the algorithm, which at a minimum includes the last x and y values. If it's helpful you can pass additional values in the result and use it in the next iteration, like radius and angle in the example.
I recommend reading the example functions and modifying them to understand how they work. I also recommend googling some cool (x,y) plots and converting them to placement functions. For investigation you could modify my script here.
Here are some placement algorithms I created that are different than the provided spiral one. When the debug parameter is set to true you can see what the algorithm is plotting. Please note that respectScreenScale may need to be set to false in order to render these on the home screen due to memory limitations.
| Dark Mode | Light Mode | Simplified Input |
|---|---|---|
 |
 |
{ placementFunction: galaxyPlacementFunction, respectScreenScale: false } |
 |
 |
{ placementFunction: galaxyPlacementFunction, respectScreenScale: false, debug: true } |
 |
 |
{ placementFunction: starPlacementFunction, respectScreenScale: false } |
 |
 |
{ placementFunction: starPlacementFunction,, respectScreenScale: false, debug: true } |
Word clouds aren't complete without modifying the font! A weight function can be provided to modify how the words are displayed. You can use this function to convert weight to size, font type, opacity, color, and more! Here's the default method for context:
  /**
   * @param {WordCloudWord} wordCloudWord
   *   - The word that is being processed.
   * @return {WordCloudProcessedWord}
   *   - The word after processing.
   */
  _defaultWeightFunction(wordCloudWord) {
    const max = 60;
    const min = 10;
    return new WordCloudProcessedWord({
      word: wordCloudWord.word,
      wordCloudFont: new WordCloudFont({
        fontName: "TrebuchetMS-Bold"
      }),
      fontSize: (wordCloudWord.weight / 10) * (max - min) + min,
      color: Device.isUsingDarkAppearance() ? Color.white() : Color.black()
    });
  }
Just as I mentioned above, I recommend playing with the functions provided and getting creative. Here are some examples using built-in fonts:
| Dark Mode | Light Mode | Simplified Input |
|---|---|---|
 |
 |
{ weightFunction: builtInFestiveWeightFunction } |
 |
 |
{ weightFunction: hackerWeightFunction } |
You can use custom fonts too! Before you get too excited custom fonts require specific setup and are not guarranteed to work. The word cloud algorithm depends on generating word 'hitboxes' to make sure words don't overlap with each other. At this time the hitboxes are generated by rendering the word with Scriptable's WebView tool. Custom fonts aren't referencable from within the tool so they have to be installed on the fly using a CSS stylesheet URL. The word cloud itself is being rendered using Scriptable's DrawContext so the font needs to be installed locally too for the whole thing to work.
TL;DR: You need to both install the font locally and provide a reference to the CSS stylesheet hosted somewhere online to use custom fonts. This has currently only been tested with Google fonts. Here's an example:
// https://fonts.google.com/specimen/Lacquer
  function spookyWeightFunction(wordCloudWord) {
    return new WordCloudProcessedWord({
      word: wordCloudWord.word,
      wordCloudFont: new WordCloudFont({
        fontName: "Lacquer",
        cssUrl: "https://fonts.googleapis.com/css2?family=Lacquer&display=swap"
      }),
      fontSize: (wordCloudWord.weight / 10) * (maxFont - minFont) + minFont,
      color: Color.orange()
    });
  }
The fontName is the font family. This article suggests this app is the safest way to download fonts to iOS. Be careful, use at your own risk!
After all of that hassle I hope you agree the effort is worth it! Once these fonts are installed they will begin working:
| Font Link | Dark Mode | Light Mode | Broken / Missing Font | Simplified Input |
|---|---|---|---|---|
| Lacquer |  |
 |
 |
{ weightFunction: builtInFestiveWeightFunction } |
| Cinzel Decorative |  |
 |
 |
{ weightFunction: hackerWeightFunction } |
| Fredericka the Great |  |
 |
 |
{ weightFunction: stencilWeightFunction } |
All of these features can be joined together with backgrounds to create beautiful word clouds. The word cloud class is transparent, so simply add another image as the background image and voila! For widgets you can add this to your script:
widget.backgroundImage = await new Request('YOUR IMAGE URL').loadImage();
| Image Link | Result | Simplified Input |
|---|---|---|
| "Milky Way" | 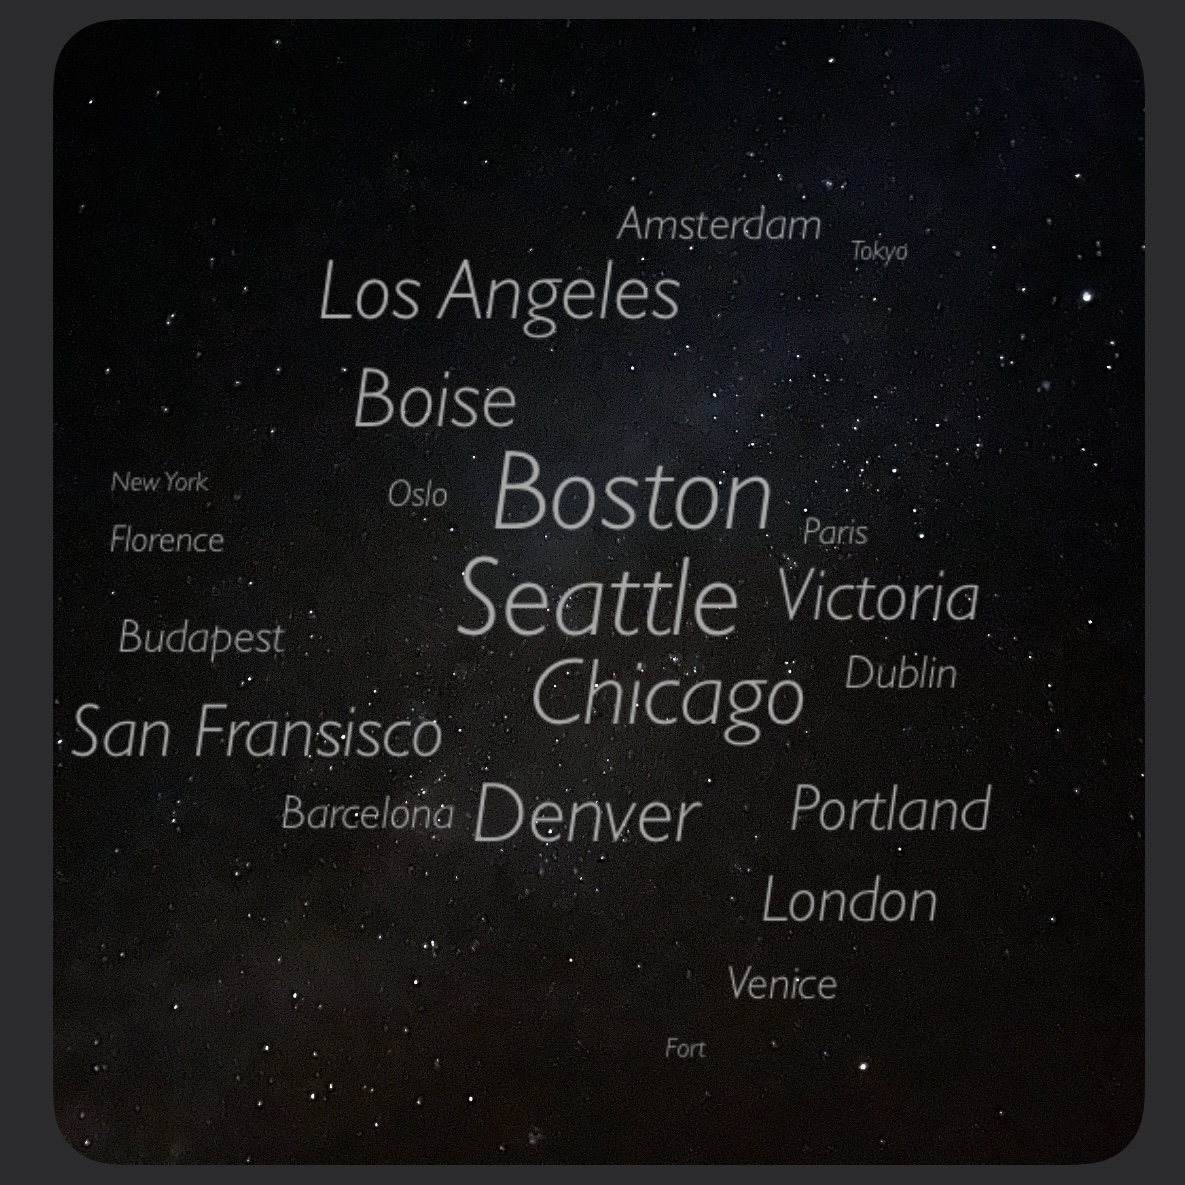 |
{ weightFunction: celestialWeightFunction, placementFunction: galaxyPlacementFunction, respectScreenScale: false } |
| "Mountain" | 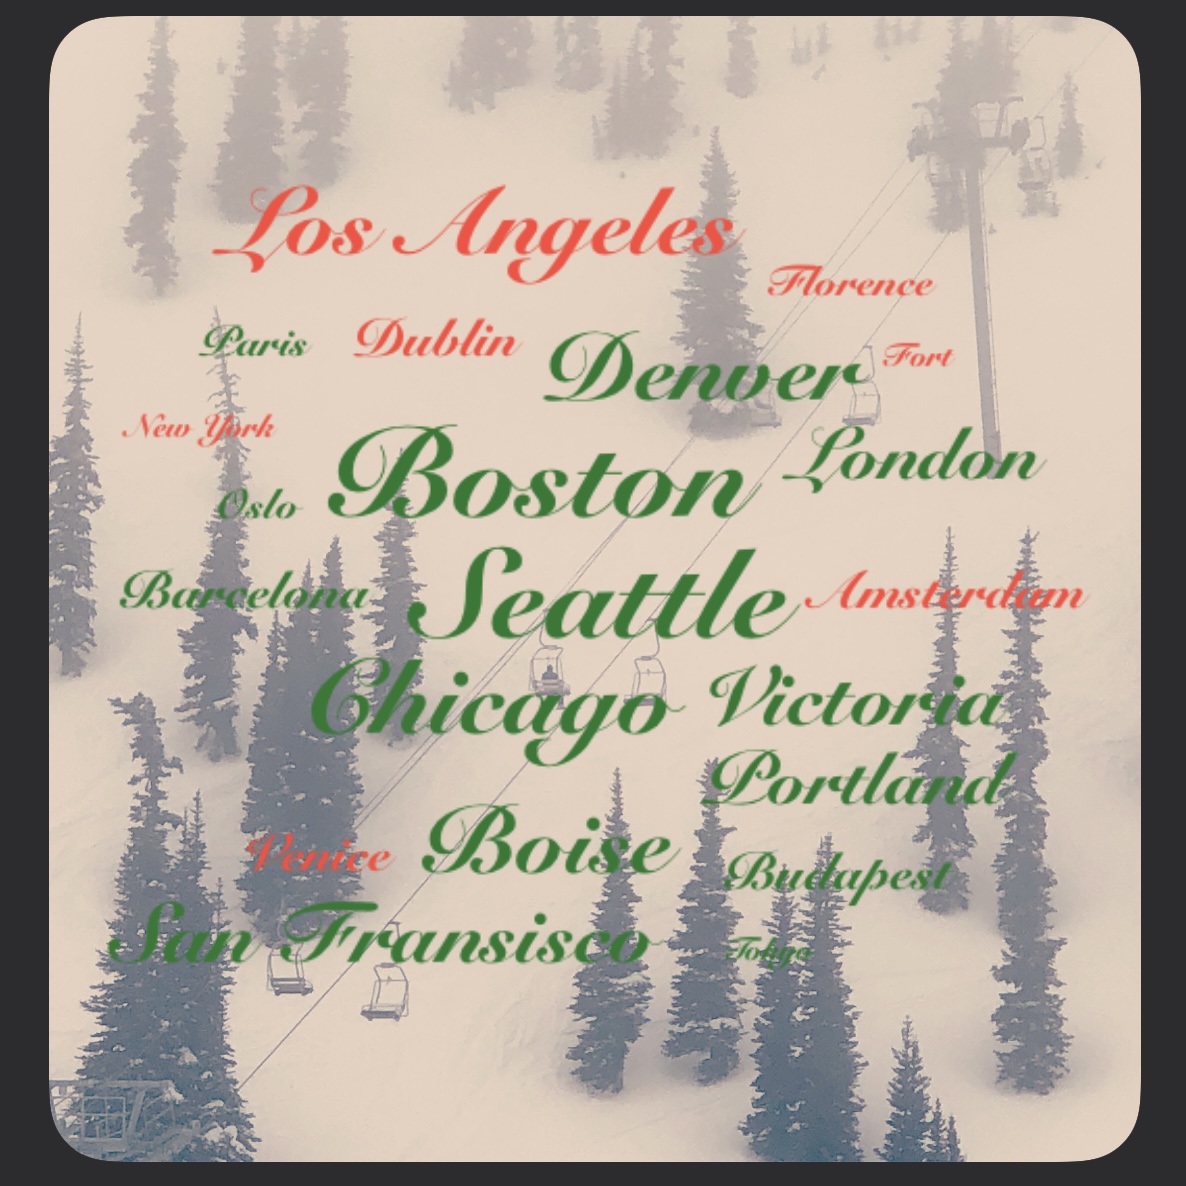 |
{ weightFunction: builtInFestiveWeightFunction } |
If you enjoyed this demo or the scripts please consider buying me a coffee! I'd also love it if you tried out my other scripts on GitHub. Thanks again!