
The Unity Toon Shader (UTS3) is a set of toon shaders designed to meet the needs of creators working on cel-shaded 3D-CG animations.
The Unity Toon Shader is compatible with all render pipelines: the Built-in Render Pipeline, the Universal Render Pipeline (URP), and the High Definition Render Pipeline (HDRP). However, there are some differences in the features supported by different render pipelines. Please refer to Feature Difference for details about each render pipeline.
Unity Toon Shader is the successor to Unity-chan Toon Shader ver 2.0 (UTS2), which was popular for years in games and animations. However, UTS2 was designed solely for the Built-in Render Pipeline, consisted of many different shaders, could not be installed through the Package Manager window, and had a different license from other Unity software.
In animation production, color specialists specify detailed color designs for every scene. UTS can apply these color specifications as written in the design instructions. UTS allows users to apply specific colors for light and shadow areas regardless of the actual light colors in the scene. This feature is essential for cel-shaded character designs. UTS provides detailed control over whether the directional light color affects materials.
Typical color design instruction example:

- A: Highlight Color
- B: Base Color
- C: 1st Shading Color
- D: 2nd Shading Color
Three basic colors—base color, 1st shading color, and 2nd shading color—play key roles in character design with the Unity Toon Shader. Please refer to Three Color Map and Control Map Settings for more information.
Besides the three basic colors, the Unity Toon Shader provides a wide variety of features such as Highlight, Rim Light, Emission, Angel Ring, Material Capture (MatCap), and some special maps.
To get started with cel-shading, see Getting Started.
- Unity Toon Shader
- Requirements
- Installation
- Getting started
- Material Converter
- Inspector Window Settings
- Modes
- Shader Settings
- Three Color Map and Control Map Settings
- Shading Step and Feather Settings
- Normal Map Settings
- Highlight Settings
- Rim Light Settings
- Material Capture (MatCap) Settings
- Emission Settings
- Angel Ring Projection Settings
- Scene Light Effectiveness Settings
- Metaverse Settings (Experimental)
- Outline Settings
- Tessellation Settings (the Built-in Render Pipeline)
- Tessellation Settings (HDRP)
- Additional features for HDRP
- Samples
- Feature Difference
- Known Issues
This repository utilizes symbolic links to share code across multiple projects. On Windows 10 or later, symbolic link creation is restricted by default for regular users, which can lead to issues when working with this repository.
To resolve this, follow the steps below to enable symbolic link creation and configure Git appropriately.
- Open Local Security Policy by typing
secpol.mscon Windows Command Prompt
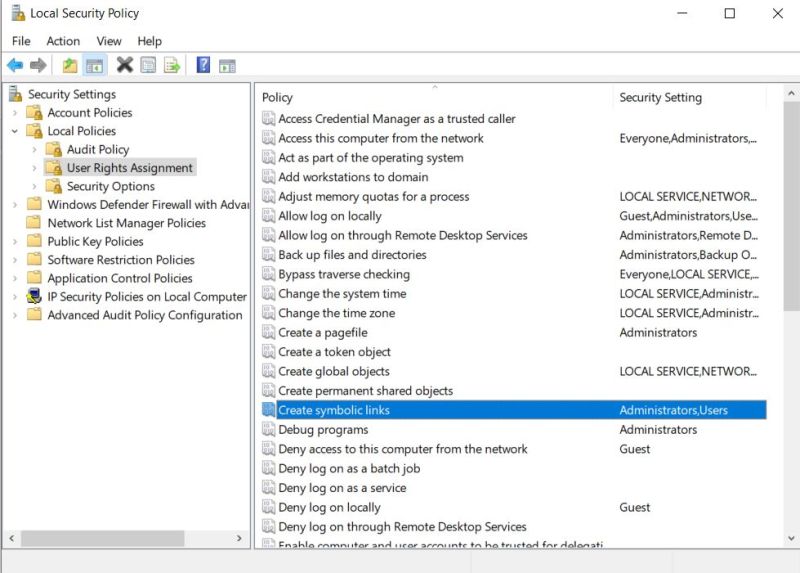
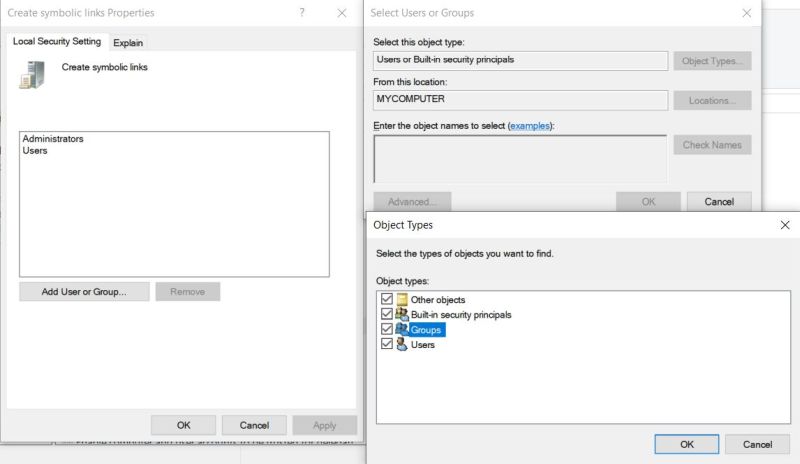
- Under User Rights Assignment, find a policy called Create symbolic links and open it.
- Click Add User or Group
- Click Object Types
- Make sure Groups is checked and click OK.
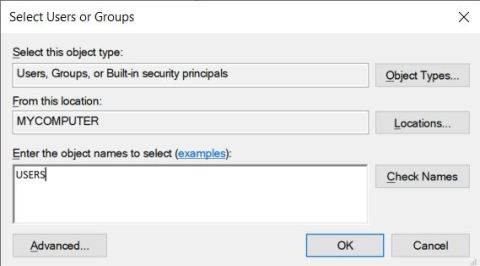
- Type USERS inside the textbox and click on Check Names to verify it, then click OK.
- Configure git to allow symbolic links. For example, by typing the following in Git Bash:
git config --local core.symlinks true
git config --global core.symlinks true
Auto-generated on Wed Oct 15 14:06:35 UTC 2025