Configuration Sun Tracking
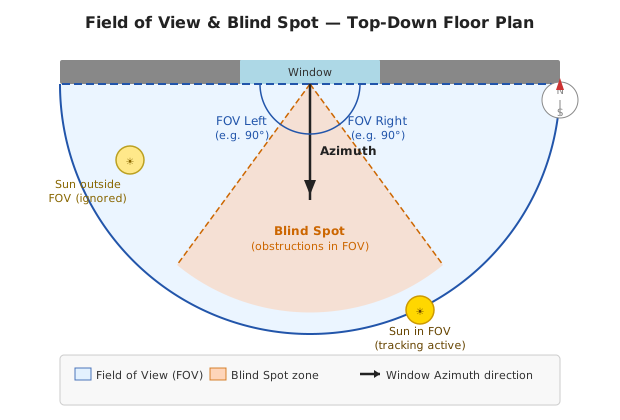
Renamed in v2026.8.0: what earlier releases called Field of View is now Sun acceptance angle. It names the arc sunlight is accepted from, rather than something an observer looks out through, which is what the old name kept implying. The rename is display-only — the option keys are still
fov_leftandfov_right, service fields and diagnostics attributes are unchanged, and nothing in your config or automations breaks.
Where these fields live: Window Azimuth, Sun acceptance angle, and Shaded Distance moved from the Sun Tracking step to the Geometry step in v2.28+ (#778). They're documented here because they shape sun tracking, but you'll configure them on the Geometry step (see your cover type's configuration page). The elevation limits, blind-spot/glare toggles, the sun tracking gate, and Minimize Movements options below remain on the Sun Tracking step.
| Variable | Default | Range | Description |
|---|---|---|---|
| Window Azimuth | 180 | 0–359 | (Geometry step) Compass direction the window faces. Discoverable via Open Street Map Compass |
| Sun acceptance angle — left | 90 | 0–180 | (Geometry step) Unobstructed arc from window centre to the left, in degrees |
| Sun acceptance angle — right | 90 | 0–180 | (Geometry step) Unobstructed arc from window centre to the right, in degrees |
| Minimal Elevation | None | 0–90 | Sun must be above this angle before tracking activates |
| Maximum Elevation | None | 0–90 | Sun must be below this angle for tracking to activate |
| Enable Blind Spot | False | Enables the Blind Spot step: define an angular range where an obstruction blocks direct sun | |
| Enable Glare Zones | False | Enables the Glare Zones step (vertical blinds only): protect named floor areas from direct sun | |
| Sun tracking gate sensors | none | Optional binary sensors that decide whether to sun-track right now — see Sun tracking gate below | |
| Sun tracking gate template (optional) | none | A Jinja template; truthy = track | |
| Sun tracking gate template logic | OR | How the template combines with the sensors — OR or AND
|
|
| Minimize Movements | False | Opt-in. Snaps sun tracking to a few fixed coverage levels instead of following the sun continuously — far fewer motor movements. See Minimize Movements below | |
| Maximum Coverage Steps | 1 | 1–10 | Only used when Minimize Movements is on. How many distinct positions the cover may use to reach full coverage. 1 = jump straight to full coverage |
The sun acceptance angle defines the horizontal angular range from which the integration accepts direct sun. Outside this range the sun is treated as "not in front of the window" and the cover returns to the default position.
Measurement steps:
- Stand at the centre of the window, inside your room, looking straight out (perpendicular to the wall: this is the azimuth direction).
- Look left: find the furthest point where direct sunlight can enter through the window without being blocked by a wall, pillar, overhang, or neighbouring building. Estimate the angle between straight-ahead and that point. That is the left acceptance angle.
- Repeat looking right for the right acceptance angle.
- A smartphone protractor app (or a simple protractor held flat) makes this easier to measure accurately.
Recommended values by situation:
| Situation | Left / right angle |
|---|---|
| Standard window, no obstructions | 45° each side |
| Wide window or sliding glass door | 60–75° each side |
| Narrow window or recessed into a thick wall | 30° each side |
| Protecting furniture or artwork from any direct sun | Measure actual unobstructed angle (see below) |
Protecting fragile furniture or artwork: The default 90° per side (180° total) is intentionally wide to work for most installations. However, if your goal is to prevent any direct sunlight from reaching a specific area, use the actual unobstructed angle your window allows, not the default. Measure from the window centre to the edge of whichever wall, column, or frame first blocks direct sun on each side. A tighter angle means the blind engages as soon as direct sun could enter, and stays in the default (typically more closed) position at all other times.
Example: A south-facing window set into a 60 cm thick wall may only allow direct sun within ±40° of perpendicular. Setting both acceptance angles to 40° ensures the blind is always active during those hours, rather than the wider 90° default which would leave gaps.
If you would rather not estimate the angles by eye, the Geometry step has a Generate sun acceptance angle from measurements button that computes them from two physical measurements:
- Window width — the visible glass width.
-
Reveal depth — how far the glass is recessed from the outer wall face (the depth of the reveal). A flush window has a reveal depth of
0, which yields the full 90° per side.
Tick the button and submit. The integration fills the left and right acceptance angles from the geometry — angle = atan(width / depth) — then clears the button so you can fine-tune either angle independently. The sliders stay visible and editable throughout, so the generated values are a starting point, not a lock.
A deeper reveal (or a narrower window) blocks direct sun sooner on each side and produces a tighter angle; a wide, shallow window produces a wider one.
Upgrading from a version before v2.28.0? The earlier formula under-reported the angle by roughly half. Re-open the Geometry step for any cover you configured from measurements and confirm the acceptance angles look right after upgrading.
Added in v2026.8.0. Sun tracking is normally either on or off for a cover. The sun tracking gate lets binary sensors or a Jinja template decide when it applies — track only while your air conditioning is calling for cooling, only while someone is home, only on weekdays.
Configured on the Sun Tracking step:
| Field | Default | Meaning |
|---|---|---|
| Sun tracking gate sensors | none | One or more binary sensors (or input_boolean / switch / schedule). on = track. Any one being on is enough. |
| Sun tracking gate template (optional) | none | A Jinja template; truthy = track. |
| Sun tracking gate template logic | OR | How the template combines with the sensors — OR (either says track) or AND (both must). |
Leave all three unset — the default — and nothing changes: the cover tracks whenever Enable Sun Tracking is on. The gate only ever narrows that.
What happens while the gate is closed: the solar handler declines, and the decision chain simply carries on to whatever sits below it — normally the default position. The cover is not forced anywhere, and the operating window stays open.
{{ is_state('climate.upstairs_zone', 'cool') }}Use the thermostat's mode (cool) rather than its hvac_action (cooling). Mode is stable and changes seasonally; hvac_action follows the compressor, which cycles every few minutes and would move your covers with it.
Both take sensors plus a template, but they answer different questions and have different blast radii.
| Sun tracking gate | Daytime gate | |
|---|---|---|
| Question | "Should the cover sun-track right now?" | "Is it day or night?" |
| When closed | Solar positioning is skipped; the chain falls through | The operating window closes and the sunset position is applied |
| Also affects | Glare zones drop their sun-tracking-only limits (below) | Climate mode, glare zones, cloud suppression and motion timeout all stop too |
Reach for the daytime gate when you want the close to follow real darkness. Reach for the sun tracking gate when you want everything else to keep working and only the sun-following to pause.
Unaffected while the gate is closed: climate mode, motion timeout, manual override, custom position slots, weather safety, and the operating window.
One thing does change: glare zones keep running, but they drop their sun-tracking-only limits — Min Position During Sun Tracking and the sun only position/tilt clamps. Those exist to shape the cover while it is following the sun, so with tracking paused they no longer apply and the glare position is weighed against the default instead. If you use glare zones together with a gate, this is the behaviour to expect.
The gate never fails closed. If every configured sensor (and the template, when used) goes unavailable or unknown at once, it holds its last-known verdict for two minutes so a brief dropout — a Zigbee blip, a restart of the source integration — doesn't disturb the cover. If nothing recovers inside that window, the gate gives up its opinion and sun tracking resumes, exactly as if no gate were configured.
That direction is deliberate: an unavailable thermostat should never silently leave a cover un-shaded on a hot afternoon.
When the gate stops solar, the solar handler still appears in the decision trace with a reason, rather than vanishing from it — so you can tell "the gate is closed" apart from "sun tracking is turned off" and from "the sun isn't on this window". The Panel card and the diagnostic sensors show the same reason.
"Is the AC running?" is usually one answer for the whole house, not a per-window measurement — so the gate is Building Profile-owned. Set it once on the profile and every linked cover inherits it; a cover that needs its own answer overrides it locally, like any other shared sensor.
By default, sun tracking repositions the cover continuously: as the sun drifts, the calculated position changes by a percent or two, and the cover nudges to follow it. Over a day that adds up to a lot of small motor movements. Some motors are noisy, some are slow, and some users simply prefer the cover to settle and stay put.
Minimize Movements (opt-in, off by default) trades fine-grained tracking for far fewer movements. Instead of following the sun continuously, it snaps the tracked position to one of a small number of fixed coverage levels. Maximum Coverage Steps (1–10) sets how many levels there are between fully open and full coverage.
The quantization always rounds toward more coverage, never less — so this setting can only ever block more direct sun than plain tracking would, never less. You give up some natural light in exchange for fewer movements; you never give up sun protection.
- 1 step (the default when enabled): The moment the sun enters the sun acceptance angle, the cover moves straight to full coverage and holds there until the sun leaves. This is the fewest possible movements — one move in, one move out.
- 2 steps: The cover uses at most two stops on its way to full coverage — roughly half-closed, then fully closed — as the required coverage grows through the day.
- 3 steps: Three stops (about one third, two thirds, full), and so on up to 10.
Because the value is stable across many sun positions, the integration's normal delta position threshold suppresses the in-between commands automatically — that is what produces the reduction in movements.
"Full coverage" means whatever fully blocks direct sun for your cover:
- Vertical blinds / roller shutters — fully lowered.
- Tilt / venetian slats — slats fully closed. For venetian covers, both the carriage position and the slat tilt are quantized, so a 1-step setting drives the carriage closed and the slats closed.
- Awnings — fully extended (an extended awning is what blocks the sun).
The forecast strip on the companion Lovelace card uses the same quantization, so it shows the same stepped positions the cover will actually be commanded to — not a smooth curve the cover never follows.
Reach for this when motor noise, motor wear, or visual fussiness matters more than squeezing out maximum daylight — for example a bedroom blind you would rather have simply close when the sun hits it, or a motor that is slow or loud enough that frequent small adjustments are annoying. Leave it off if you want the cover to admit as much natural light as possible while still blocking direct sun.

🏠 Home · ✨ Features · 📰 What's New
🚀 Getting Started
- Installation
- Migrating from Custom Repository
- Migrating from Adaptive Cover
- First-Time Setup
- Building Profile ← start here if you have multiple covers
- Cover Groups
- Copy Settings to Other Covers
- Cover Types
🧠 Core Concepts
📐 Cover Types
- Vertical
- Horizontal
- Oscillating Awning
- Roof / Skylight Window
- Tilt
- Louvered Roof
- Sliding Curtain
- Day/Night Shade
- Dual Panel
- Venetian (Dual-Axis)
⚙️ Configuration
- Sun Tracking
- Position
- Position Matching
- Travel Time Calibration
- Glare Zones
- Automation
- Command Queue
- Custom Position
- Force Override
- Weather Safety
- Climate
- Templated Thresholds
- Template Self-References
- Blindspot
- Summary Screen
- Debug & Diagnostics
🔌 Entities & Services
- Entities
- Proxy Cover Entity
- Position Verification
- My Position Support (Somfy RTS)
- Runtime Configuration Services
🛠️ Operations
- Known Limitations
- Hardware Compatibility
- Troubleshooting
- Troubleshooting Findings
- Diagnostic Sensors
- Tips and Tricks
🔧 Advanced Use Cases
- Overview
- Dynamic Temperature Thresholds
- Dynamic Tracking Window
- Bedroom Sleep Mode
- Handling Variable Cloud Cover
- Indoor Lux Sensor Behind the Cover
- Venetian Tilt-Only on Overcast Days
- Forecast-Based Shading
- Custom Position When Sun in FOV
- Suppress Closing While a Door Is Open
- Keep a Blind Clear of the Sill
🎨 Dashboard
- Dashboard Cards
- Panel Card
- Tile Card
- Sky Compass Card
- Decision Strip Card
- Solar Chart Card
- History Card
🧪 Testing & Simulation
📚 Reference
👩💻 For Developers